
Installing VMWare Workstation Pro on Ubuntu Desktop
This article has been updated. See the latest version here: Installing VMware 25H2 on Ubuntu Desktop.
This is a guide that will walk you through the steps to install VMware Workstation Pro on Ubuntu Desktop. I am currently using Ubuntu 24.10 with version 6.11.x of the Linux kernel on a UEFI-based system with secure boot enabled. This guide is based on my experience with this setup and may not apply to all systems.
Download VMware Workstation Pro
To start, browse to https://support.broadcom.com and login or create an account if you don’t already have one.
Once you have logged in, navigate to the free downloads page and search for “VMware Workstation Pro”.
In the search results, click on the VMware Workstation Pro link then click on VMware Workstation Pro 17.0 for Linux to expand the download options.
Download the 17.6.2 release.
Install VMware Workstation Pro
With the download complete, open a terminal and navigate to the directory where the installer was downloaded.
Run the following command to make the installer executable.
sudo chmod +x VMware-Workstation-Full-17.6.2-24409262.x86_64.bundle
Install some pre-requisite packages before you attempt to install VMware Workstation Pro.
sudo apt update
sudo apt install build-essential linux-headers-$(uname -r)
Run the following command to install the VMware bundle.
sudo ./VMware-Workstation-Full-17.6.2-24409262.x86_64.bundle
Manually install virtual machine modules
Run the following command to get the status of the vmware service.
systemctl status vmware
If you see that the service is inactive (dead), you will need to install the vmmon and vmnet modules manually.
As mentioned above, I am using a UEFI-based system with secure boot enabled. So I need to install the modules, sign the files, and enroll the MOK key.
There are a few open-source repositories that provide the modules. I am using the vmware-host-modules by @bytium because it offers a build for the 17.6.2 release using newer kernel versions… Thanks @bytium 🎉
Run the following command to clone the repository and checkout the 17.6.2 branch.
git clone https://github.com/bytium/vm-host-modules.git
cd vm-host-modules
git checkout 17.6.2
Run the following commands to build and install the module.
make
sudo make install
Run the following commands to sign the module, enter a password for the MOK key and import it.
openssl req -new -x509 -newkey rsa:2048 -keyout MOK.priv -outform DER -out MOK.der -nodes -days 36500 -subj "/CN=VMware/"
sudo /usr/src/linux-headers-$(uname -r)/scripts/sign-file sha256 ./MOK.priv ./MOK.der $(modinfo -n vmmon)
sudo /usr/src/linux-headers-$(uname -r)/scripts/sign-file sha256 ./MOK.priv ./MOK.der $(modinfo -n vmnet)
sudo mokutil --import MOK.der
Reboot your system.
Pay close attention to the boot process. You will see a blue screen that says “Press any key to perform MOK management”. Press any key to enter the MOK management utility.
In the MOK management utility, select “Enroll MOK” then select “Continue”. You will be prompted to enter the password you set when signing the module.
Once you have entered the password, select “Reboot” to reboot your system again.
After your system has rebooted, run the following command to check the status of the vmware service.
systemctl status vmware
You should see that the service is now active (running). At this point you should be good create virtual machines.
Optionally, you can restart the vmware service to verify that all the services are running.
sudo /etc/init.d/vmware restart
You should see output similar to the following.
Stopping VMware services:
   VMware Authentication Daemon                                        done
   Virtual machine monitor                                             done
Starting VMware services:
   Virtual machine monitor                                             done
   Virtual machine communication interface                             done
   VM communication interface socket family                            done
   Virtual ethernet                                                    done
   VMware Authentication Daemon                                        done
   Shared Memory Available                                             done
Configure VMware Workstation Pro
There are some additional configurations that you should make to VMware Workstation Pro.
Open a terminal and run the following command to start VMware Workstation Pro as root.
sudo vmware
Memory settings
In the VMware Workstation Pro window, click on Edit then Preferences.
Click on Memory, select Fit all virtual machine memory into reserved host RAM under Additional Memory settings, then click Close.
Network settings
By default, VMware Workstation Pro uses DHCP to assign IP addresses to virtual machines. If you want to use a static IP address, you will need to know network settings for the NAT network.
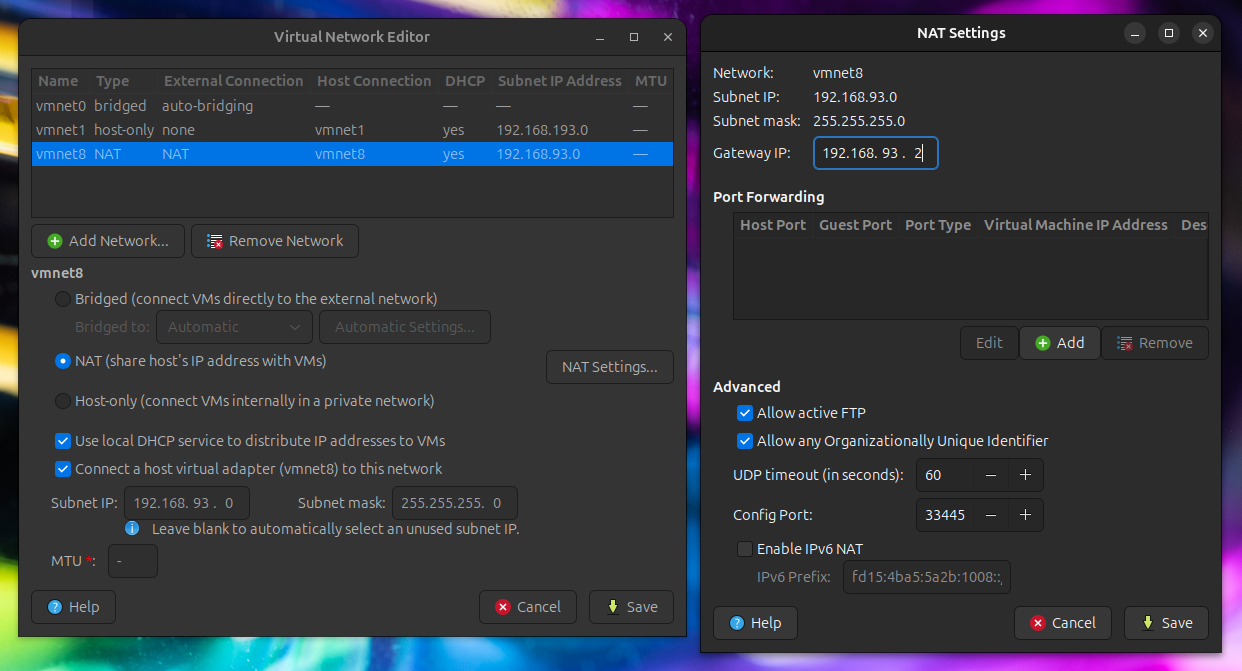
With VMware Workstation Pro open as root, click on Edit then Virtual Network Editor.
Select the NAT network and click on NAT Settings.
Here you will see the Subnet IP, Subnet Mask, and Gateway IP. You will need these values to configure static IP addresses for your virtual machines.
Summary
In this guide, you learned how to install VMware Workstation Pro on Ubuntu Desktop. You also learned how to install the vmmon and vmnet modules manually and sign them for use a UEFI-based system with secure boot enabled. The manual installation, signing, and enrollment of the MOK key may not be necessary for all systems. But if you are in a similar situation, you should be able to get VMware Workstation Pro up and running with these steps.
Hope this helps and let me know in the comments below if this guide was helpful or if you have any questions.
Peace ✌️
Uninstall VMware Workstation Pro
If you need to uninstall VMware Workstation Pro, you can run the following command.
sudo vmware-installer -u vmware-workstation
You will be prompted to keep or remove the configuration files. Type yes to remove the configuration files or quit to cancel the uninstallation process.