
Getting Started With Terraform on Azure
Check out the official Get Started - Azure tutorial here
Terraform basics
Download and Install
Download terraform from https://www.terraform.io/downloads.html
Extract the executable and add the folder to your PATH variable
Open a shell and type
terraform versionThe basic commands we’ll use are:
terraform initterraform planterraform applyterraform destroy
I advise you to use the
terraform fmtcommand often to ensure your scripts well formatted according to HashiCorp’s style conventions
Folder structure
Terrafrom executes on the files within a folder that are named with the .tf extension. Here is what a typical folder structure looks like:
.
├── main.tf
├── outputs.tf
└── variables.tf
main.tfis where the deployment scripts will be written tooutputs.tfis where the output variables will be definedvariables.tfis where the variables will be defined
Optionally, you can add a main.auto.tfvars files to set values for your variables. Defining them here will allow you to avoid passing in variable values on terraform apply. More on that here.
HashiCorp Configuration Language (HCL)
HashiCorp domain specific language for defining infrastructure deployment details. This is especially beneficial for organizations with multi-cloud strategies.
Authoring HCL is pretty straight-forward and there are tons of example code found on Terraform docs website.
Basic structure of an Azure deployment requires the following provider and resources:
- The
azurermprovider - An
azurerm_*resource - Optionally,
azurerm_*data can be used to import pre-existing resources into your Terraform state file
Here is a sample where we use the azurerm provider to deploy a resource group
main.tf
provider "azurerm" {
  features {}
}

resource "azurerm_resource_group" "rg" {
  name     = var.rg_name
  location = var.rg_location
  tags     = var.rg_tags
}
In the example above, you can see that the syntax looks a bit like JSON but IMO a little easier to read.
Providers are required so that Terraform will know which modules it needs to download to execute the deployment.
Keep a close eye on provider versions as they are updated constantly to keep up to date with cloud providers. Not all resources are available in azurerm providers. Some deployments may require the use of
azurerm_template_deploymentwhereby you can have Terraform execute ARM templates
As you define resources, you’ll notice they all begin with the resource keyword followed by the resource type defined in the azurerm provider. In the example above, we are referencing a azurerm_resource_group for our Azure resource group deployment and defining it as rg. In object-oriented programming concepts, think of rg as an instance of azurerm_resource_group. These instances are used as pointers to specific deployments. Makes sense to keep the instance names unique as you can have multiple resources in a single deployment and Terraform will need a way to identify each unique instance.
For example, we can add the next bit of HCL code to deploy an Azure Container Registry in our resource group.
resource "azurerm_container_registry" "acr" {
  name                = var.acr_name
  resource_group_name = azurerm_resource_group.rg.name
  location            = azurerm_resource_group.rg.location
  sku                 = var.acr_sku
  admin_enabled       = var.acr_admin_enabled
}
As you can see, our acr deployment requires a resource_group_name and location so we can simply reference it from the rg instance.
This is pretty much all you need to know to be dangerous with Terraform.
Additional details can be found at the links below:
- https://www.terraform.io/docs/configuration/index.html
- https://registry.terraform.io/providers/hashicorp/azurerm/latest/docs
Last but not least, I’d recommend you use VSCode as your editor with the hashicorp.terraform extension installed to assist with HCL editing using the Terraform language server.
Let’s go deploy to Azure using Terraform
Take a look at the following article to understand how Terraform can authenticate to Azure
We will simply use Azure CLI locally or in Azure Cloud Shell
Azure Cloud Shell can also be accessed using Windows Terminal
Open your favorite shell and login to azure-cli
az login
az account show

# if the incorrect subscription is selected, set it using this command
az account set -s <your_subscription_id>
Create a new directory
mkdir terraform-sample
cd terraform-sample
Finding syntax to deploy a resource is as simple as browsing to the docs for azurerm, filtering for a resource, copying the example code, and modify as needed. Will deploy a storage account
When searching for resources to deploy, make sure you are looking at
resourcesand notdata. More on that below when we get into state.
Create your variables.tf file and add in the following code:
variable "resourcegroupname" {
  type    = string
  default = "myresourcegroup11242020x"
}

variable "location" {
  type    = string
  default = "westus2"
}

variable "storageaccountname" {
  type    = string
  default = "mystorageaccount11242020"
}
I have default values here so that we don’t have to pass in any values on
terraform applyor use tfvars file (for now)
Create your main.tf file and add in the following code:
provider "azurerm" {
  version = "=2.37.0"
  features {}
}

resource "azurerm_resource_group" "example" {
  name     = var.resourcegroupname
  location = var.location
}

resource "azurerm_storage_account" "example" {
  name                     = var.storageaccountname
  resource_group_name      = azurerm_resource_group.example.name
  location                 = azurerm_resource_group.example.location
  account_tier             = "Standard"
  account_replication_type = "GRS"

  tags = {
    environment = "dev"
  }
}
Since this is the first time we are running the Terraform commands in this directory, we need to issue the terraform init command to get the azurerm plugins
Plan your deployment using terraform plan command. Take a look at the output and confirm the resources you intend to deploy
Apply changes to your Azure subscription by using the terraform apply command. You’ll need to type in the word yes to confirm the deployment. Optionally, you can use the terraform --auto-approve if you do not want to be bothered by the confirmation request
Log into the Azure Portal and confirm your resources are deployed then use the terraform destroy command to delete.
State?!?
You’ll notice in your working directory that as you deployed your resources, there are new files with tfstate named something like this:
terraform.tfstateterraform.tfstate.backup
These files are here because Terraform manages state of your deployment. It will understand what is and what isn’t deployed based on your script and will keep that info in these files.
If you need to reference resources that were deployed in your Azure subscription outside of Terraform, you can import the details of the resource using
datamodules in theazurermprovider.
This is okay if you are working on demos and keeping the state files on your machine. If you need to work on production deployments, you’ll need a remote state management solution.
You have a few options here:
- Use Azure Storage to keep track of state files
- Use Terraform Cloud - we’ll use this in the next exercise
Terraform cloud
Check out the official Get Started - Terraform Cloud tutorial here
If you don’t already have an account on Terraform Cloud, create one
Login to Terraform Cloud
Create an organization
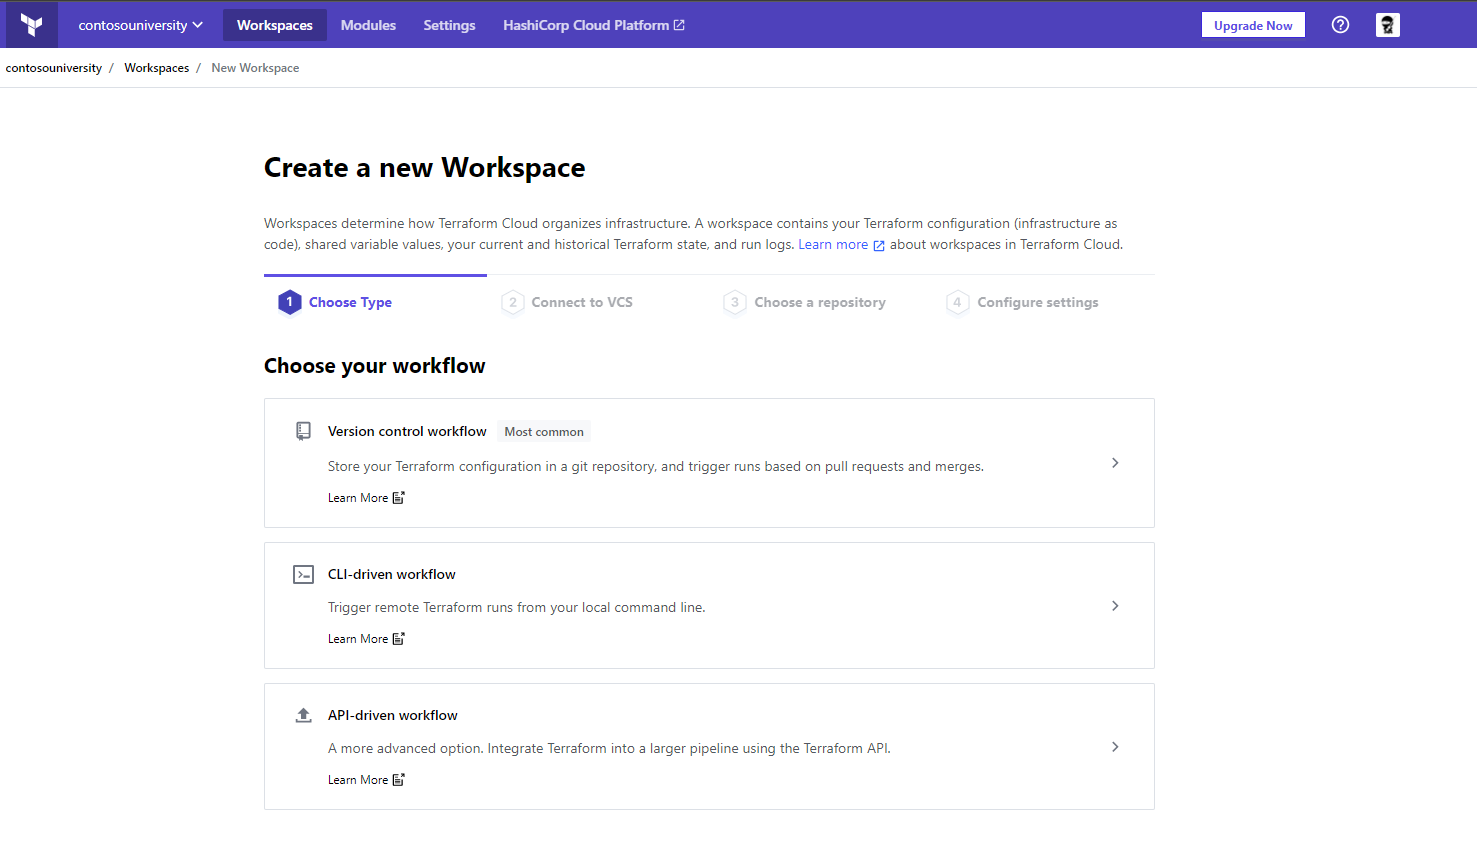
Create a workspace and choose a workflow - let’s click “CLI driven workflow”
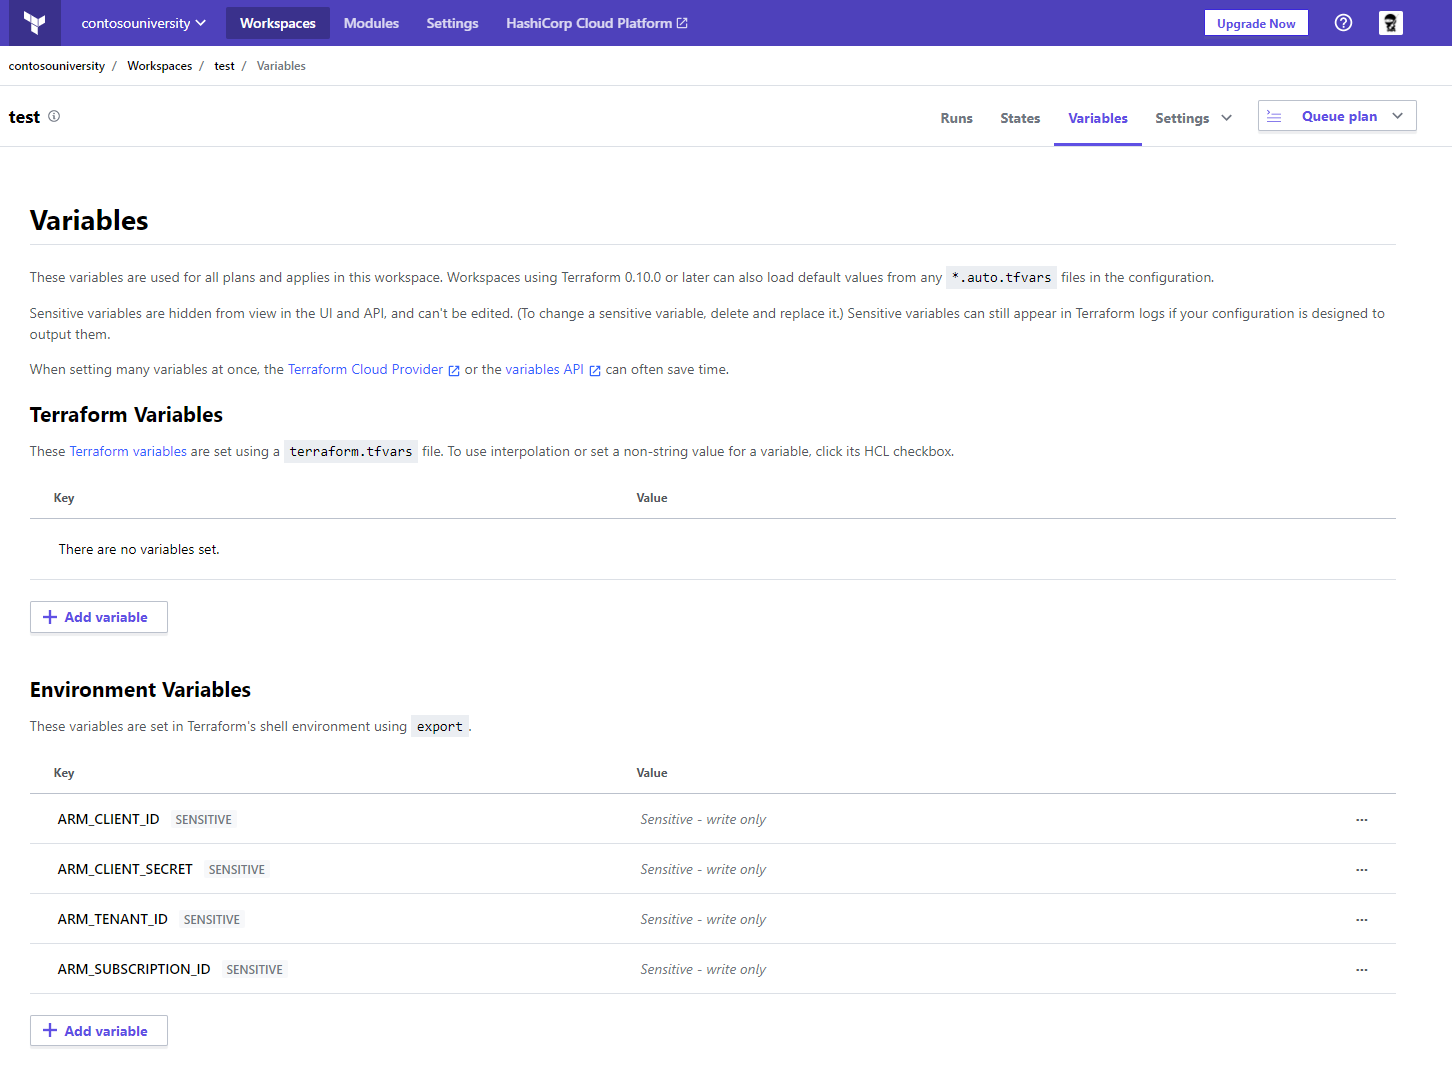
In order for Terraform Cloud to connect to your Azure subscription, you’ll need to create a new service principal and add the object’s values as variables in your workspace
Create a service principal using Azure CLI
az ad sp create-for-rbac -n tf-operator
The output will contain all that you need to configure your workspace variables. Map the values to these specific environment variables in your workspace
ARM_CLIENT_IDARM_CLIENT_SECRETARM_TENANT_IDARM_SUBSCRIPTION_ID
Create a new file in your working directory called backend.tf and add in the following code
terraform {
  backend "remote" {
  organization = "<your_organization_name>"

  workspaces {
    name = "<your_workspace_name>"
  }
}
If you still have tfstate files in your working directory, delete them
Now that we added a new backend, we’ll need to run terraform init
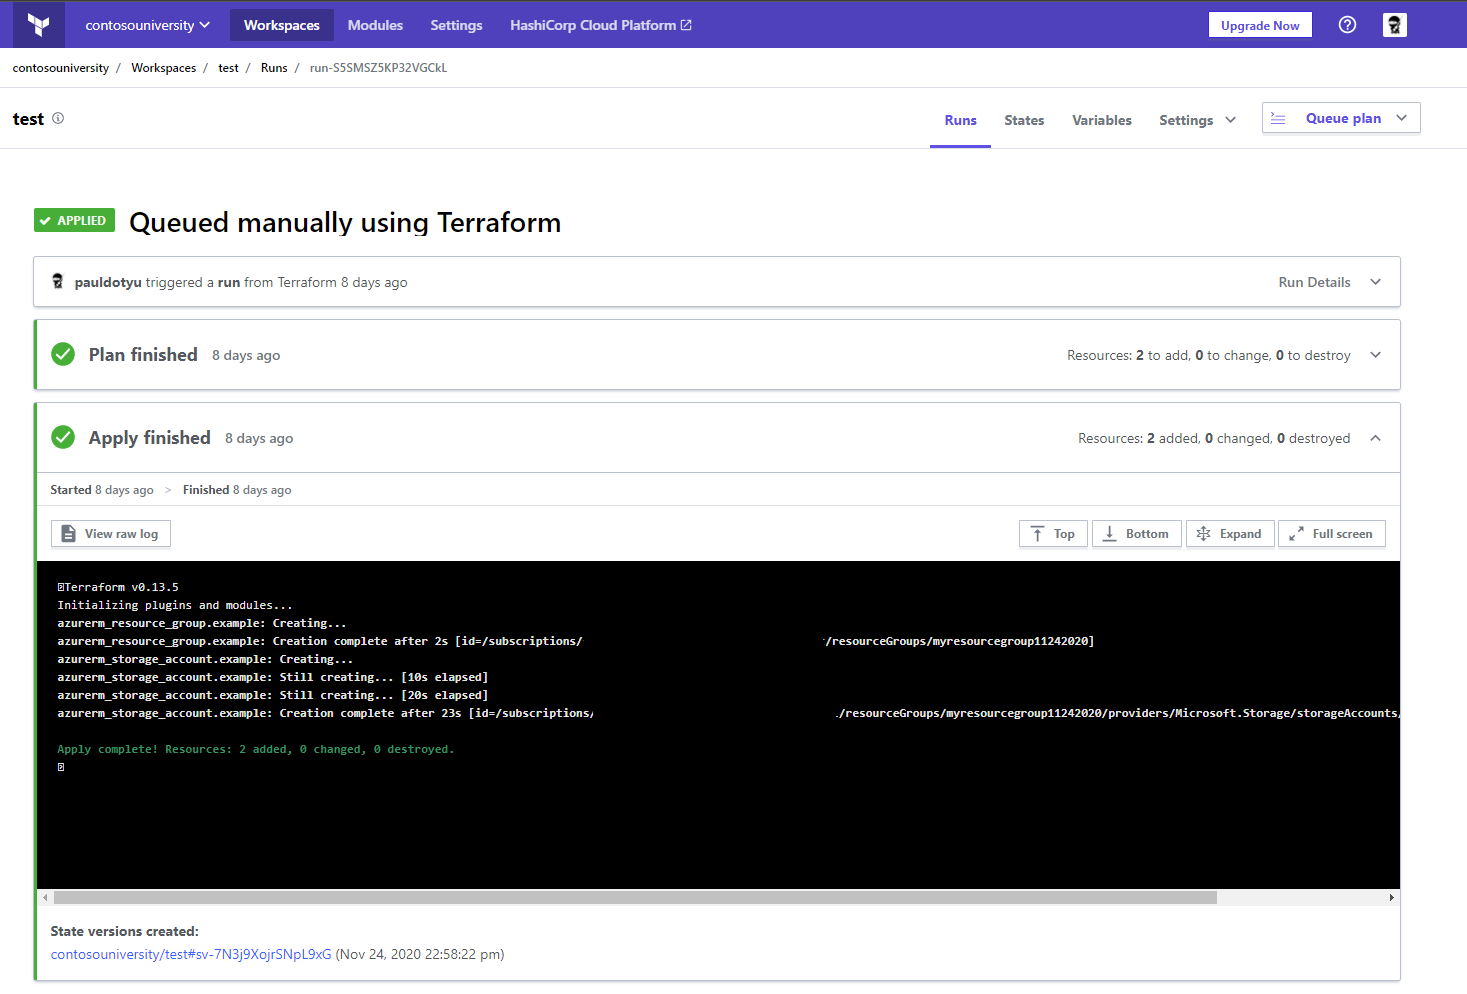
Run terraform plan and notice it is being run in Terraform Cloud
Run terraform apply and notice it is being run in Terraform Cloud
In Terraform Cloud, navigate to your workspace, and click on the Runs tab to view results
GitOps
Check out the official Automate Terraform with GitHub Actions tutorial here
In GitHub, create a new repository, add your .tf files, commit, and push
Browse to Terraform Cloud settings and create a new API token for github-actions.
Browse to your GitHub and navigate to Settings.
In Settings, click on Secret and add a new Repository secret named TF_API_TOKEN
Paste in the token you generated in Terraform Cloud

Navigate to Actions and add in the setup-terraform action
Make a change to your terraform source code, do a push, and you’ll notice the GitHub Action queueing a new plan and apply in Terraform Cloud
Some Tips
If using Bash, set an alias for the terraform command to something short like tf so you don’t have to spell out terraform each time
alias tf=terraform
Use Hashicorp’s azurerm provider docs as your guide!
Always plan to build and use modules as maintaining monolithic deployments in a single main.tf file can get overwhelming after a while