
Monitoring Azure Container Apps With Azure Managed Grafana
The Azure Monitor team has announced the general availability of the Azure Managed Grafana (AMG) service. As part of the announcement, they also announced the availability of curated Grafana dashboards for various Azure services including Azure Container Apps 🎉
Grafana is very popular within the Cloud Native community and it seems natural to use it for Azure Container Apps (ACA) observability.
In this post, I will walk you through provisioning the ACA and AMG resources using the Terraform AzAPI provider and show you how easy it is to import the ACA dashboards into your AMG instance.
Let’s go!
Prerequisites
Before we begin, make sure you have the following:
Terraform project setup
In your favorite terminal window, create a project directory and drop into the folder.
mkdir aca-with-amg
cd aca-with-amg
All instructions will be in Bash. Most of the commands should work in PowerShell. If you do not have a local Bash terminal, I’d recommend you try these commands in Azure Cloud Shell (Bash).
Create a new main.tf file. This is the entry point for Terraform.
touch main.tf
Open the main.tf file using your favorite text editor and add the following code to tell Terraform which providers you will be using.
terraform {
  required_providers {
    azurerm = {
      source  = "hashicorp/azurerm"
      version = ">=3.0.0"
    }

    azapi = {
      source  = "azure/azapi"
      version = ">=0.5.0"
    }
  }
}

provider "azurerm" {
  features {
    resource_group {
      prevent_deletion_if_contains_resources = false
    }

    key_vault {
      purge_soft_delete_on_destroy = false
    }
  }
}
Let’s test to make sure everything is good so far. Run the following command in your terminal. Terraform will initialize the project and download provider plugins.
az login # log into azure
terraform init # initialize terraform directory
You will see a note about initializing the backend. This example will use a local backend, but you should use a remote backend like Azure Blob Storage or Terraform Cloud for production deployments
Naming things
Naming things is hard! To make naming resources easy, let’s use the random provider to help uniquely name resources. Add this to your main.tf file.
resource "random_pet" "aca" {
  length    = 2
  separator = ""
}

resource "random_integer" "aca" {
  min = 000
  max = 999
}

resource "random_string" "aca" {
  length  = 5
  lower   = true
  upper   = false
  numeric = true
  special = false

  keepers = {
    # Generate a new random_string on every run to avoid a conflict with the previous revision
    none = timestamp()
  }
}

locals {
  resource_name        = format("%s", random_pet.aca.id)
  resource_name_unique = format("%s%s", random_pet.aca.id, random_integer.aca.result)
  location             = "eastus"
}
To keep things simple, I’ve hard-coded the
locationlocal variable toeastuschange this to a different region that supports both ACA and AMG if necessary.
Now that we added a new provider, you’ll have to run the terraform init command again.
Sprinkle some azurerm on it
We’ll start with the resources that are available in the azurerm provider.
Azure Resource Group
Azure resources are deployed into a resource group. Add this to main.tf.
resource "azurerm_resource_group" "aca" {
  name     = "rg-${local.resource_name}"
  location = local.location
}
Azure Log Analytics Workspace
ACA requires an ALA workspace. Add this to main.tf
resource "azurerm_log_analytics_workspace" "aca" {
  name                = "law-${local.resource_name_unique}"
  resource_group_name = azurerm_resource_group.aca.name
  location            = azurerm_resource_group.aca.location
  sku                 = "PerGB2018"
  retention_in_days   = 30
}
What’s a Terraform AzAPI provider?
At the time of this writing the ACA and AMG resources are not available in the azurerm provider, so we need to use the new Terraform AzAPI provider. This provider calls into the Azure ARM REST APIs which makes it possible to deploy and manage any Azure ARM resource via Terraform.
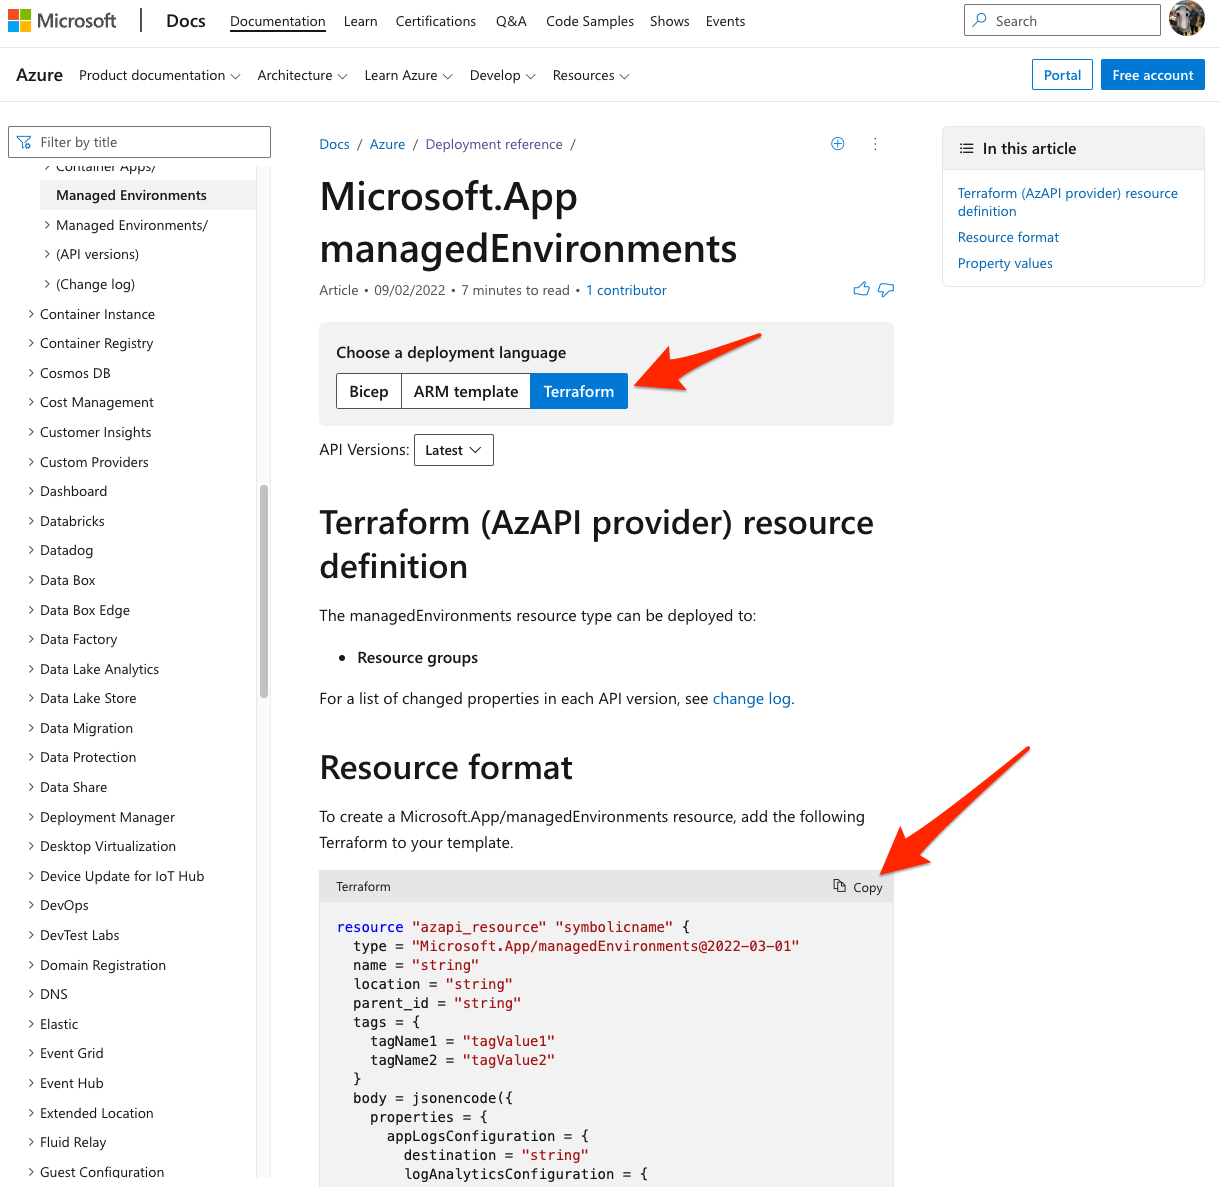
Azure Docs has documented all ARM resources with Bicep, ARM template, and now Terraform definitions.
In the example below for Microsoft.App/managedEnvironment, you will see a Terraform button. If you click the button, you will see the entire schema and object definitions for deploying this resource. Nice!
Azure Container App Environment
Let’s add this to main.tf to create an ACA environment.
resource "azapi_resource" "env" {
  type      = "Microsoft.App/managedEnvironments@2022-03-01"
  name      = "env-${local.resource_name}"
  parent_id = azurerm_resource_group.aca.id
  location  = azurerm_resource_group.aca.location

  body = jsonencode({
    properties = {
      appLogsConfiguration = {
        destination = "log-analytics"
        logAnalyticsConfiguration = {
          customerId = azurerm_log_analytics_workspace.aca.workspace_id
          sharedKey  = azurerm_log_analytics_workspace.aca.primary_shared_key
        }
      }
    }
  })
}
Azure Container App
With the environment in place, we can now define our first helloworld container. Add the following to the main.tf.
resource "azapi_resource" "helloworld" {
  type      = "Microsoft.App/containerApps@2022-03-01"
  name      = "helloworld"
  parent_id = azurerm_resource_group.aca.id
  location  = azurerm_resource_group.aca.location

  body = jsonencode({
    properties = {
      managedEnvironmentId = azapi_resource.env.id
      configuration = {
        ingress = {
          allowInsecure = false
          external      = true
          targetPort    = 80
          traffic = [
            {
              label          = "dev"
              latestRevision = true
              weight         = 100
            }
          ]
        }
      }
      template = {
        containers = [
          {
            name  = "helloworld"
            image = "mcr.microsoft.com/azuredocs/containerapps-helloworld:latest"
            resources = {
              cpu    = 0.5
              memory = "1.0Gi"
            }
          }
        ]
        revisionSuffix = random_string.aca.result
        scale = {
          minReplicas = 0
          maxReplicas = 30
          rules = [
            {
              name = "http-rule"
              http = {
                metadata = {
                  concurrentRequests = "100"
                }
              }
            }
          ]
        }
      }
    }
  })

  # this tells azapi to pull out properties and stuff into the output attribute for the object
  response_export_values = ["properties.configuration.ingress.fqdn"]
}
This configuration will deploy a container with external ingress and autoscaling enabled.
Azure Managed Grafana
When deploying an AMG instance, you must have the Owner role assigned on your Azure subscription. This is so that we can assign the Monitoring Reader role on your AMG instance to read data from Azure Monitor across your subscription. Also, the Grafana Admin role should be assigned to your account so that you can manage and authenticate to the Grafana dashboard portal using Azure Active Directory.
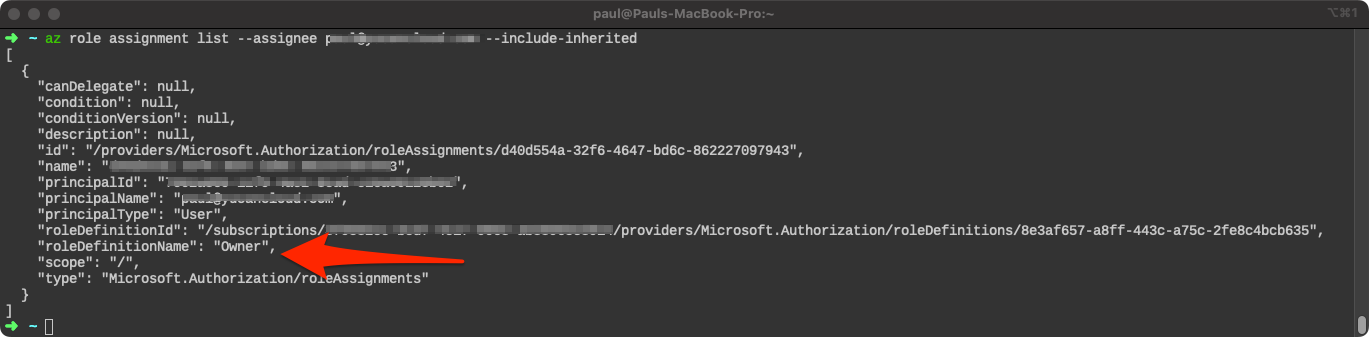
To check your role assignments using Azure CLI, you can run the following command:
az role assignment list --assignee <YOUR_USER_NAME> --include-inherited
If you see a "roleDefinitionName": "Owner" over "scope": "/" or "scope": "/subscriptions/<YOUR_SUBSCRIPTION_ID>" then you are ready to proceed. If not, you may need to contact your administrator for assistance.
Add the AMG configuration to main.tf.
resource "azapi_resource" "amg" {
  type      = "Microsoft.Dashboard/grafana@2022-08-01"
  name      = "amg-${local.resource_name}"
  parent_id = azurerm_resource_group.aca.id
  location  = azurerm_resource_group.aca.location

  identity {
    type = "SystemAssigned"
  }

  body = jsonencode({
    properties = {
      apiKey                            = "Enabled"
      autoGeneratedDomainNameLabelScope = "TenantReuse"
      deterministicOutboundIP           = "Enabled"
      publicNetworkAccess               = "Enabled"
      zoneRedundancy                    = "Disabled"
    }
    sku = {
      name = "Standard"
    }
  })

  # this tells azapi to pull out properties and stuff into the output attribute for the object
  response_export_values = ["identity.principalId"]
}
This will assign a System-Assigned managed identity and export the identity.principalId property which is needed for role assignment.
Azure Role Assignments
Since we need to add Azure role assignments, we’ll need to add the subscription and current login context as data sources. Add this to main.tf.
data "azurerm_subscription" "aca" {}
data "azurerm_client_config" "aca" {}
We can now add our role assignments to main.tf.
resource "azurerm_role_assignment" "amg_reader" {
  scope                = data.azurerm_subscription.aca.id
  role_definition_name = "Monitoring Reader"
  principal_id         = jsondecode(azapi_resource.amg.output).identity.principalId # the managed identity of the AMG resource
}

resource "azurerm_role_assignment" "amg_admin" {
  scope                = azapi_resource.amg.id
  role_definition_name = "Grafana Admin"
  principal_id         = data.azurerm_client_config.aca.object_id # your azure login context's object id
}
Outputs for testing
Terraform can return deployment properties using outputs. We’ll format text to return helloworld container app’s ingress URL. Add this to your main.tf file.
output "helloworld_ingress_url" {
  value = format("%s%s", "https://", jsondecode(azapi_resource.helloworld.output).properties.configuration.ingress.fqdn)
}
Normally, the best practice is to put outputs in a
outputs.tffile but for this demo, dropping everything into themain.tffile is fine for now.
Deploy to Azure 🚀
Before we run the deployment using the terraform apply command, we should perform terraform fmt to clean up our code according to Terraform’s style guide and perform terraform validate to ensure the code doesn’t have errors. Run the following commands in your terminal.
terraform fmt # cleans up code spacing and alignment
terraform validate # validates code does not have errors
You should see Success! The configuration is valid.
Run the following command to deploy.
terraform apply
You should see an output from the Terraform plan with a prompt confirming your deployment.
Normally you would run the
terraform plan -out=tfplancommand followed by aterraform apply tfplancommand as a best practice but since we are just demo’ing, this is fine for now.
Testing the helloworld container app
You should see the helloworld_ingress_url output to your console. We can use this value to test the application with the following command.
curl -IL $(terraform output -raw helloworld_ingress_url)
If you have a load testing tool installed locally, you can use that to put some load on your application and generate some metrics.
I have hey installed locally so I’ll use it to run a quick load test.
hey -c 10 -n 100 -m GET -z 3m $(terraform output -raw helloworld_ingress_url)
Congratulations, we’ve confirmed the app works 🥳
Importing Grafana dashboards
We’re nearly done. All that’s left is to perform a few manual steps to import the Grafana dashboard for ACA.
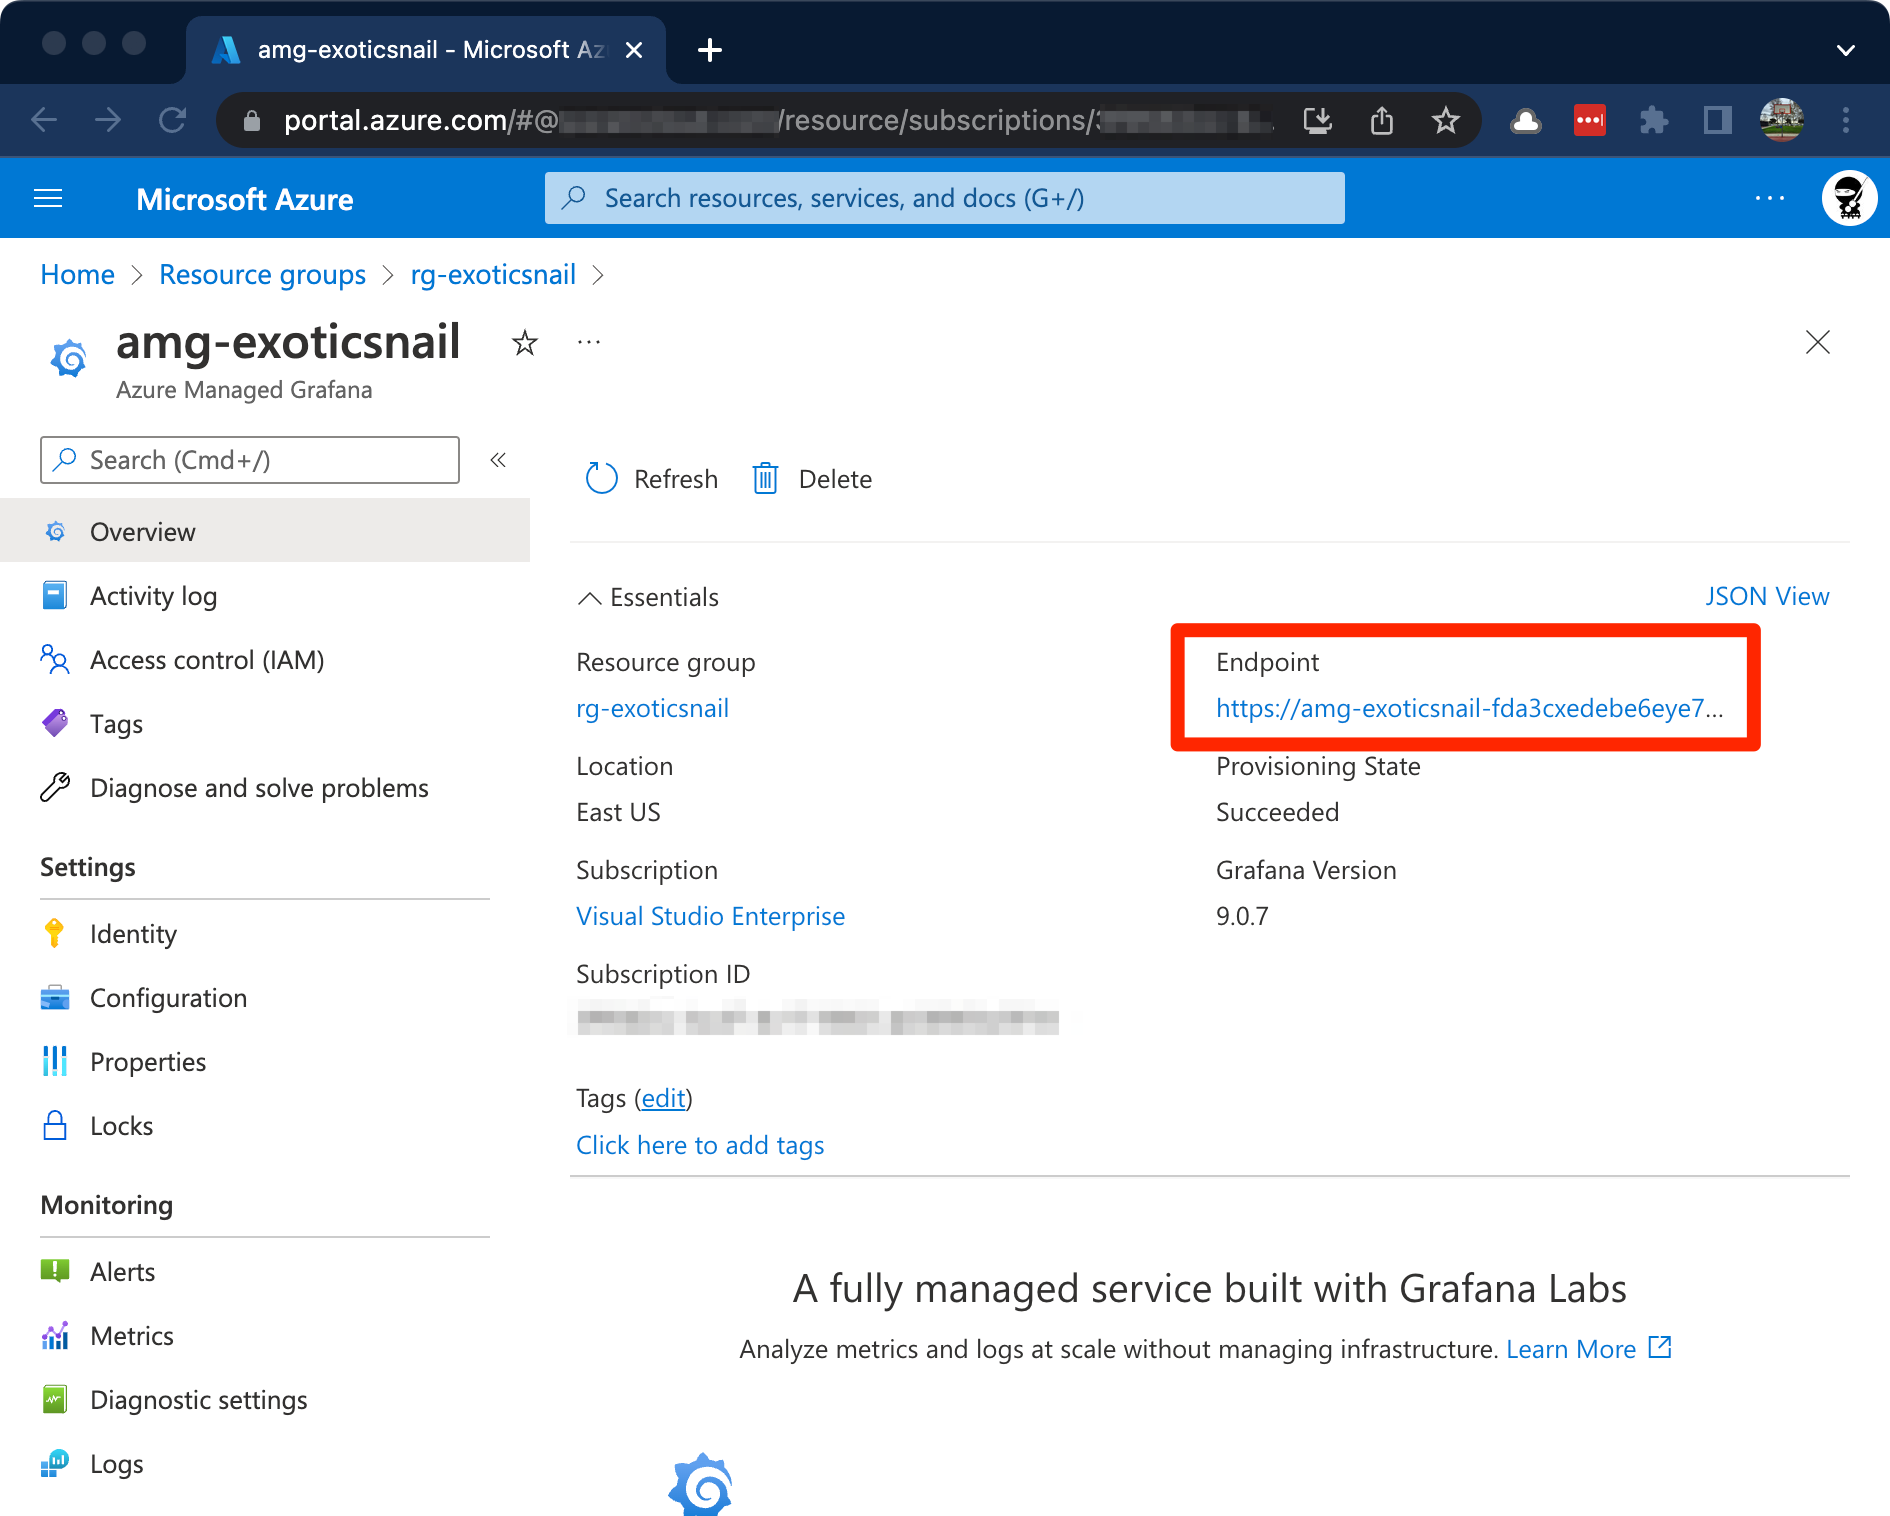
In the Azure Portal, find your AMG service and click on the Endpoint URL to navigate to the Grafana dashboard portal.
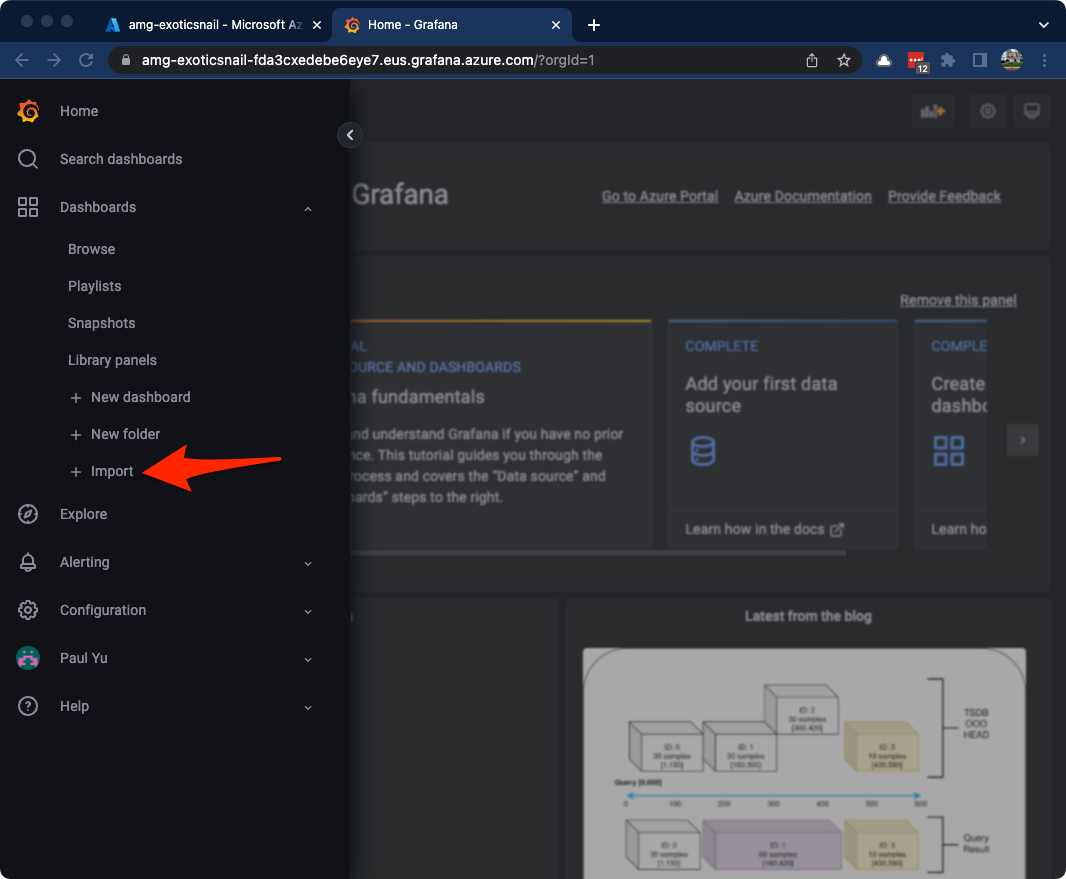
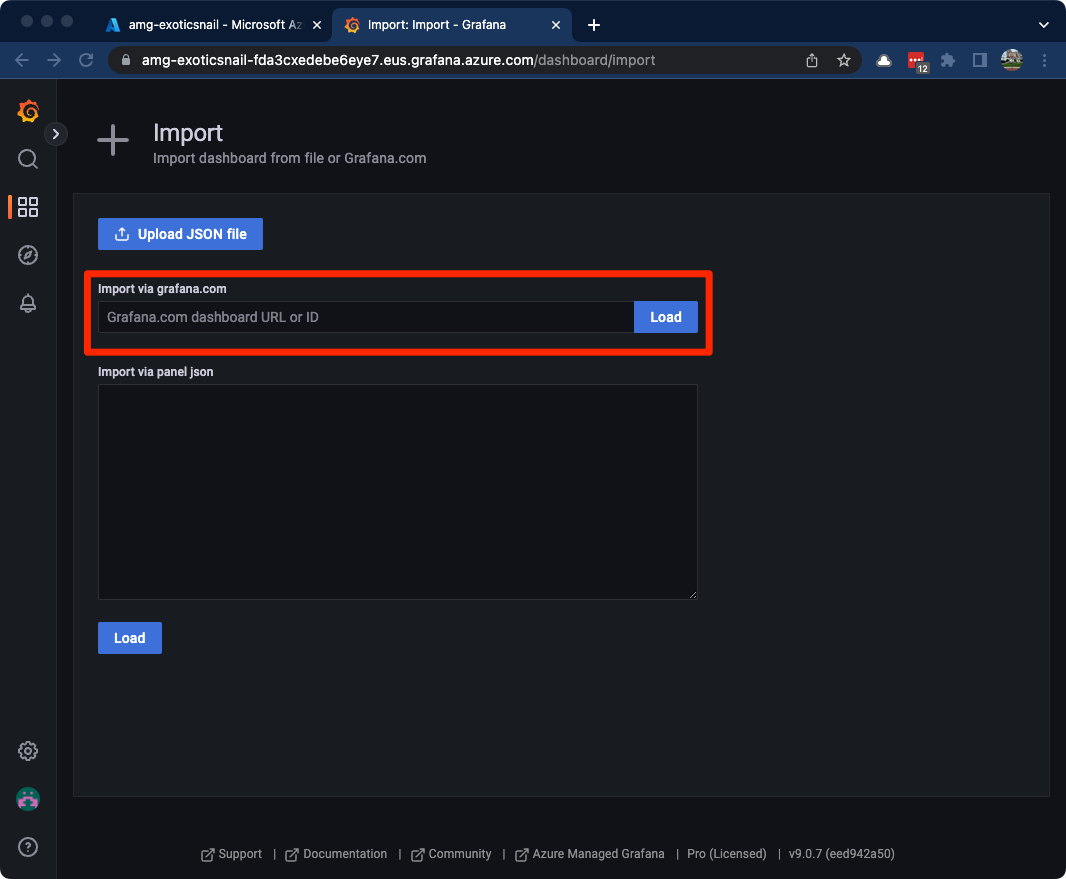
Expand the Dashboards menu item and click on the + Import button.
We can import using the dashboard URL or ID or load JSON. We’ll use the dashboard ID to make things easy.
If you browse to the Azure / Container Apps / Container App View dashboard page, you will find information on how to import the dashboard. Copy the dashboard ID.
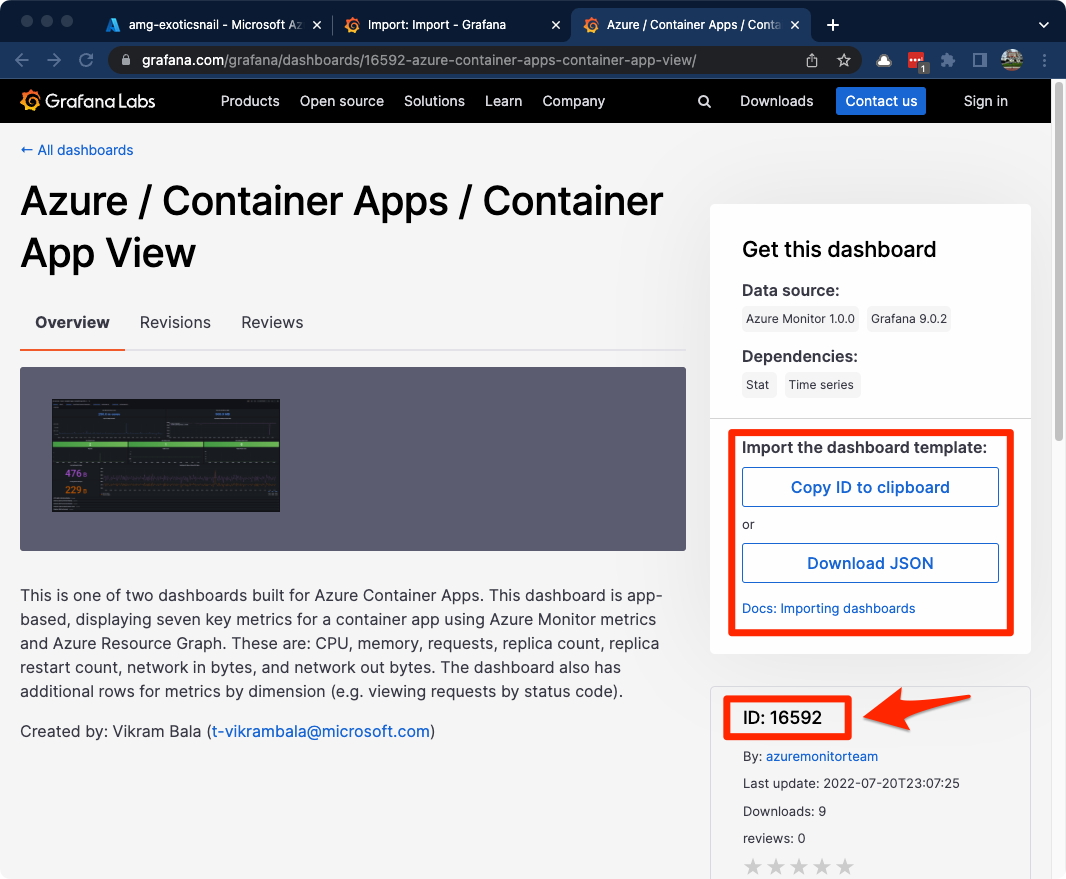
Back in your Grafana portal, enter the ID (16592) into the Import via grafana.com text box then click the Load button.
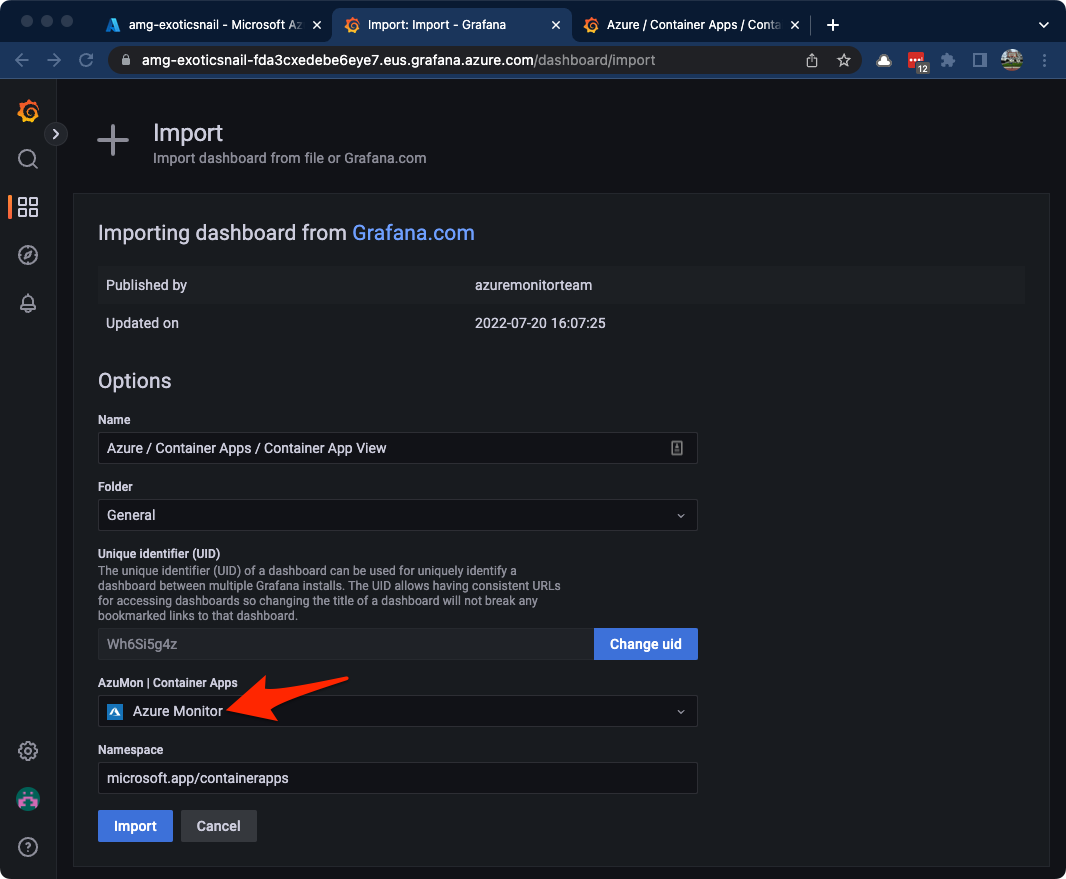
Next, select Azure Monitor as the data source for the dashboard then click the Import button at the bottom.
Browse to the dashboard and use the controls across the top of the page to select your container app. The dashboard is using Azure Monitor as a data source so you will have the option to view all container apps metrics tied to your ALA workspace.
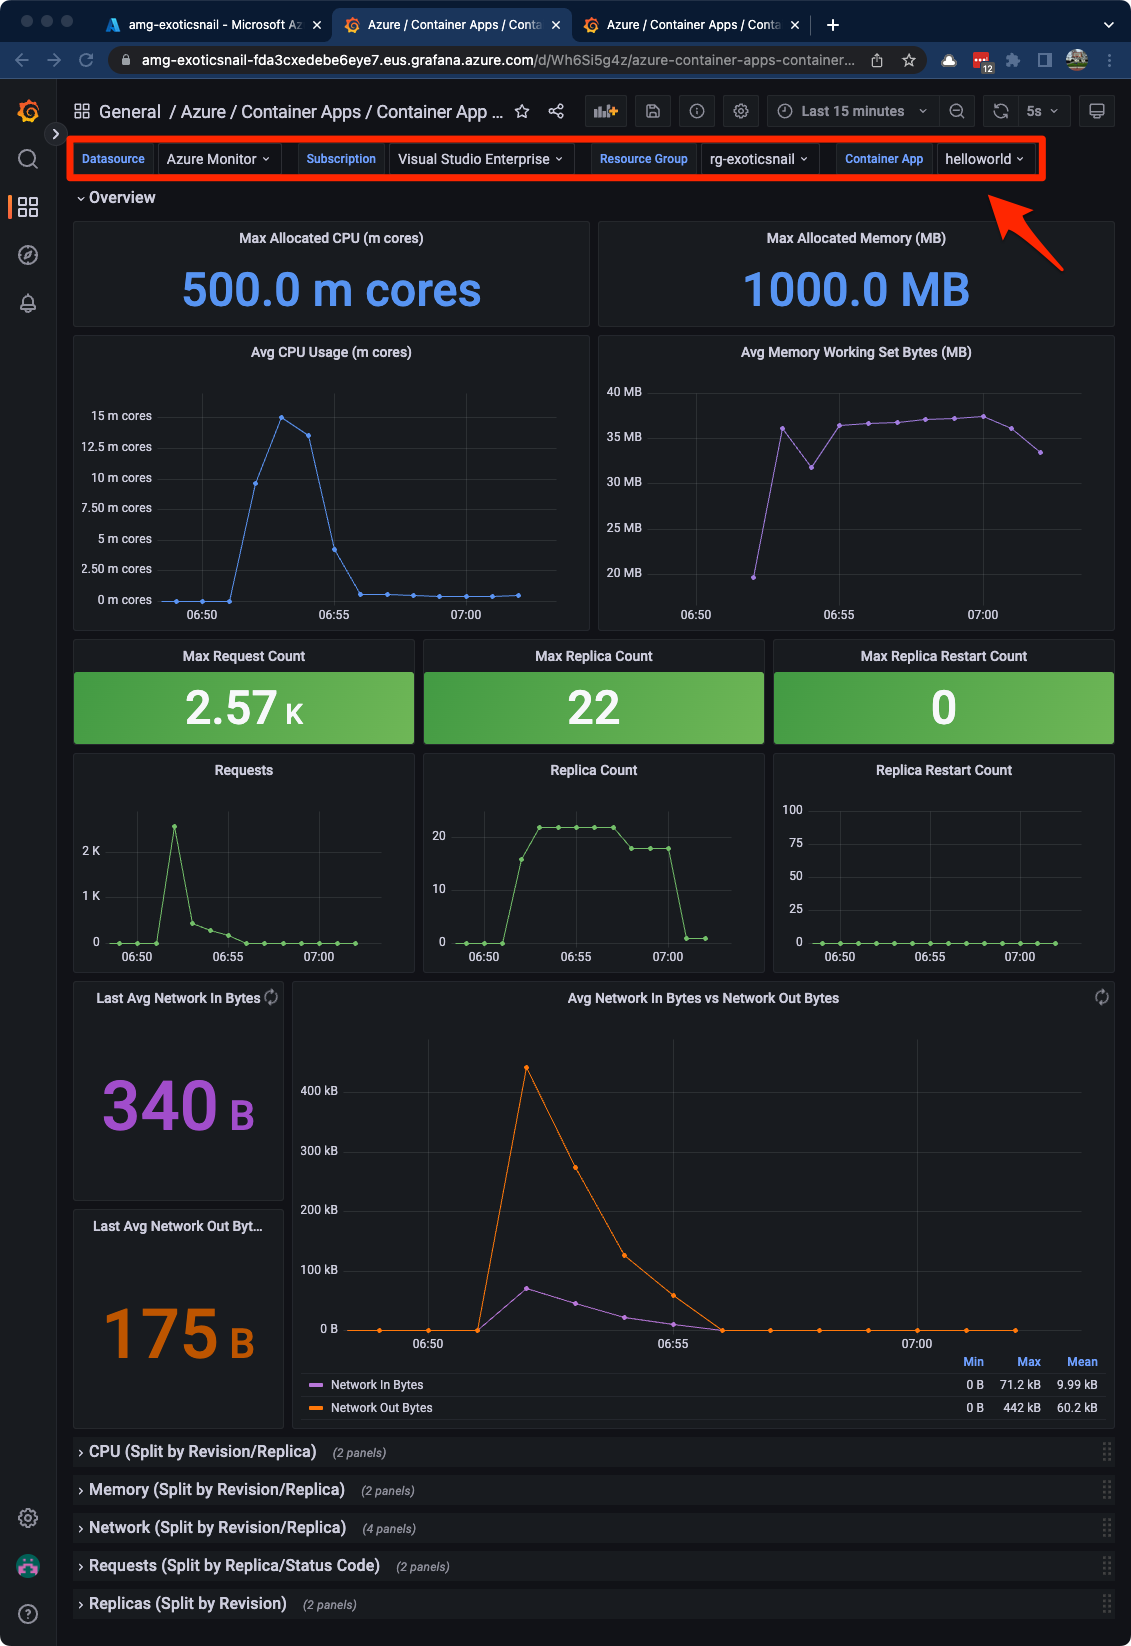
Now we have a pretty dashboard with very useful metrics 😍 Based on our load test earlier, we can see the helloworld container app scaled up from 0 replicas to 22 and back down to 0 after a few minutes.
Using Azure CLI to import Grafana dashboards
Alternatively, you can import dashboards into AMG with the following az command:
az grafana dashboard import -g <YOUR_RESOURCE_GROUP_NAME> -n <YOUR_GRAFANA_NAME> --definition 16592
⚠️ WARNING
The
az grafanacommand is currently in preview and functionality may change!
To take it a step further, we can automate the dashboard import process by adding this to your main.tf file.
resource "null_resource" "aca" {
  provisioner "local-exec" {
    command = <<-EOT
        az config set extension.use_dynamic_install=yes_without_prompt
        az grafana dashboard import -g ${azurerm_resource_group.aca.name} -n ${azapi_resource.amg.name} --definition 16592
    EOT
  }
}
⚠️ WARNING
This
null_resourceblock’slocal-execcommand includes anaz configcommand which sets your Azure CLI to install extensions without prompts. Add this ONLY if you are okay with this behavior.
Summary
That was a lot of steps in getting the resources provisioned using Terraform and the AzAPI provider, but I hope you got a sense of how easy it is to add beautifully curated dashboards to monitor your Azure Container Apps.
We only imported the Container App View dashboard and I’ll leave you with the exercise of importing the Container App Aggregate View dashboard 😉
If you have any questions or feedback, please let me know in the comments below or reach out on Twitter @pauldotyu
Cheers!
Resources
- Elevate your visualizations with Azure Managed Grafana
- What is Azure Managed Grafana?
- Export and import Grafana dashboards
- Azure Container Apps overview
- Azure Monitor data source
- azuremonitorteam Dashboards
- Overview of the Terraform AzAPI provider
- Entire code snippet for our example
main.tffile - Azure Open Source Labs: Container Apps with Terraform