
Run Terraform With Azure Pipelines
This repo will walk you through an approach to provisioning Azure resources using Terraform code stored in a Git repo and leverage Azure Pipelines (YAML-based) to deploy to dev, test, and prod environments (all in different subscriptions) with approval gates in front of test and prod environments.
Prerequisites
Azure Subscription
If you don’t have Azure, go sign up for a free account and come back.
Azure DevOps
If you do not already have an Azure DevOps organization, follow these instructions to create one.
If you do not already have an Azure DevOps project within an organization, follow these instructions to create one.
Create a new Azure Repo within a project. If you are not sure how to create one, follow these instructions.
Once you have a new empty repo created and cloned, you can move on to the next step. If you are not sure how to clone a repo, follow these instructions
Before moving forward, make sure you have a
.gitignorefile in your repo that is targeted toward omitting files that are related to Terraform but should not be committed to your repo. You should take my .gitignore file as I have modified it so that we can commit some*.tfvarsto the repo.
Azure Storage Account
Before you start, we will be using Azure Storage as our Terraform remote backend, so we’ll need a new Azure storage account in each subscription where our environments will be deployed to.
All commands below were run from a Linux environment. If you are on a Windows machine, consider using WSL.
To create your storage account, you can run the following Azure CLI command:
If you do not have Azure CLI installed, see this doc for instructions on how to install on your local machine.
# change this to your environment subscription name or guid
az account set -s "Application 1"

# change this to your environment name
env=dev

# choose a region to deploy into
location=westus

# set project name
project="terraform${env}"

# optionally, if you are using ubuntu you can install petname and use that to generate a random project name
sudo apt-get install petname
pet=$(petname --words 2 --separator "" --complexity 0)
project="${pet}${env}"

# resource group name with environment added to the end
rgname=rg-"${project}"

# storage account name - make sure this value is globally unique within all of azure
stacct="sa${project}2022"

# storage container name
container="${project}"

# create the resource group
az group create -n $rgname -l $location

# create the azure storage account
az storage account create -g $rgname -n $stacct

# create the blob container
az storage container create -n $container --account-name $stacct --auth-mode login
Once you have the storage account created, make a note of all resource group, storage account, and container and create a backend config file for terraform. I put my storage account information in a file called dev-config.azurerm.tfbackend. Here is a sample of what the file should look like:
You should create a new temporary directory to work from
cat << EOF > $env-config.azurerm.tfbackend
resource_group_name  = "$rgname"
storage_account_name = "$stacct"
container_name       = "$container"
key                  = "terraform.tfstate"
EOF
Run this command as well to create your \*.tfvars file for each environment. This may not make much sense now, but I will explain a bit more below.
cat << EOF > $env.tfvars
name     = "rg-$env"
location = "$location"
EOF
Repeat the steps above to create a storage account and config file for each environment as we will use these in our pipelines and save these files in a temp directory somewhere on your machine. These files will not be committed to your repo if you are using the .gitignore file found in this
The set of commands above are just for the dev environment, so you will need to repeat this process for test and prod
Azure AD Service Principal and Role Assignment
In order for your pipeline agent to execute your Terraform code, you will need an Azure AD Service Principal. Follow these instructions to create your service principal.
Be sure to save the output to a secure place on your machine. You will only be given the
clientSecretone time. If you loose it, you will have to go into Azure AD and generate a newclientSecret
When creating the service principal using Azure CLI, it will output details you will need to have handy for the subsequent steps, so please note the following:
appIdpasswordtenant
Next, you will need to assign the proper permissions to the service principal so that it can create resources within your subscriptions. Follow these instructions to assign the role. You will need to grant it the Contributor role for each subscription you want to deploy into.
HINT: If you have Azure Management Groups setup, you can assign the Contributor role at a top-level Management Group scope and the role assignment will be inherited by its child resources. This way, your service principal can operate against all of your subscriptions nested under the management group; otherwise, you will need to assign the Contributor role at each subscription individually. See this document on scope for more info.
Terraform
We’ll be using Terraform locally to validate our basic configuration. It is recommended to have locally, but not required. If you need to install Terraform, see this guide for more info.
Write some basic Terraform code
Create a new directory and drop in a main.tf. file.
Let’s keep it simple, we’ll only deploy azure resource groups into our dev, test, and prod environments. My initial file looks like this:
provider "azurerm" {
  features {}
}

resource "azurerm_resource_group" "name" {
  name     = var.name
  location = var.location
}
If you noticed, I am using variables for the resource group name and location since this will be different based on the environment I am deploying into.
Let’s go create a variables.tf file.
variable "name" {
  type        = string
  description = "Resource group name"
}

variable "location" {
  type        = string
  description = "Region to deploy into"
}
When we execute the terraform plan command, terraform will expect values for these variables, in the step above when we were building out our environments and storage accounts, we’ve already created \*.tfvars. This file will be passed into terraform at runtime.
You should have a
\*.tfvarsfile for each environment you plan on deploying into.
We’re nearly done with the terraform, we just need to create a backend.tf file to configure the azurerm remote backend.
terraform {
  backend "azurerm" {}
}
Notice that all we are saying above is that we want to use the
azurermbackend provider. It is missing storage account details, but we will pass that in at runtime using the\*-config.azurerm.tfbackendfiles that we created above.
Finally, let’s run a quick smoke test to make sure the code we wrote so far is valid and will not break during the Azure Pipeline runs. If you have Terraform installed locally, you can run the following commands:
az account set -s 'Application 1'
terraform init -backend-config="dev-config.azurerm.tfbackend"
terraform fmt
terraform validate
If you see the following message, we are good to go!
Success! The configuration is valid.
Now we can commit and push code to the remote repo. If you are not sure how to do this, follow these instructions to commit your code and these instructions to push your code up to the remote repo in Azure DevOps.
Here’s what I ran in my repo:
git add .
git commit -a -m 'Initial commit'
git push
Setting up Azure Pipeline Library and Environments
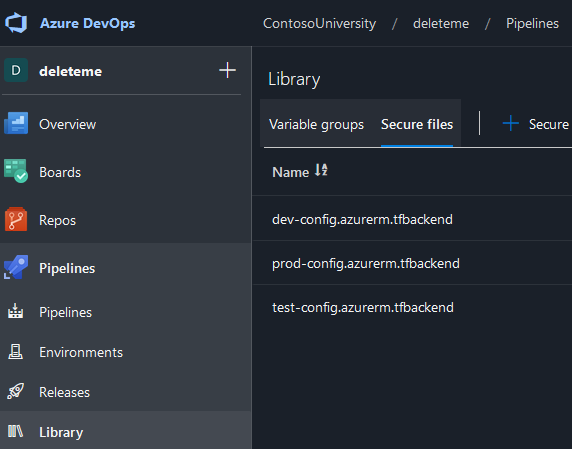
In your Azure DevOps project, under Pipelines, click on the Library link and then the Secure files tab. From there, click the + Secure file button and upload all your *-config.azurerm.tfbackend files
Next, click on the Environments button and click on the Create environment button and create a new environment. In the modal form that pops up, simply give it a name, optionally enter a description and select None for Resource then click Create.
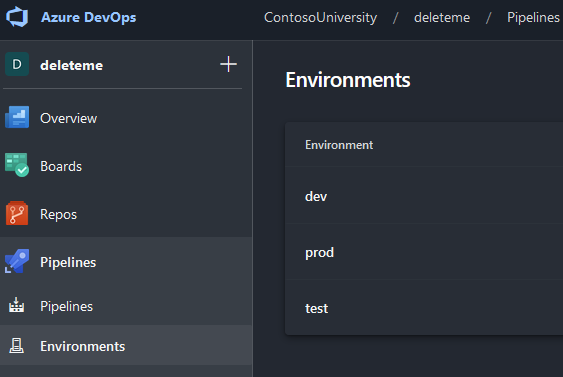
Repeat the process for the other environments that you plan to deploy into.
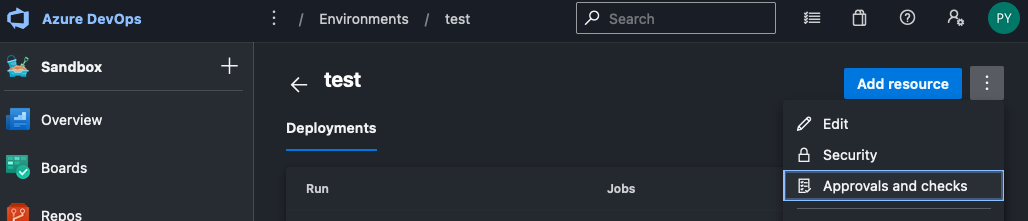
Now, click into your test environment and click the 3 dots to the right of the blue Add resource button to bring up a menu. Click on Approvals and checks
Click on Approvals to add your first check. Enter your Approvers and click Create
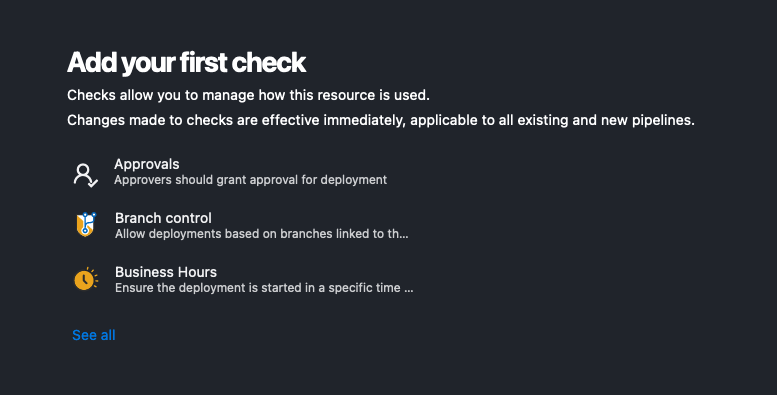
Your environment should look like this:
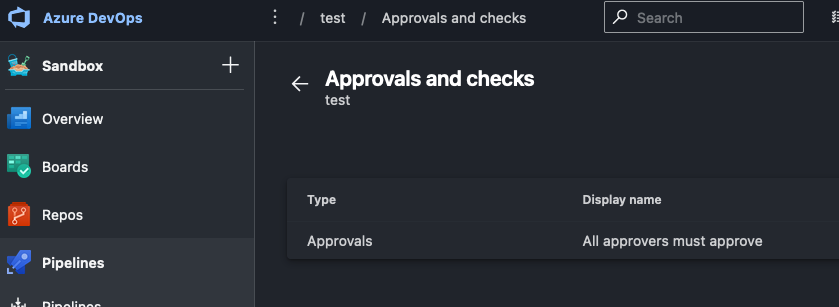
Repeat this process for the prod environment. We will not need to add an approval check for dev environment as we will let deployments go through without any checks in place.
Write our Azure Pipeline
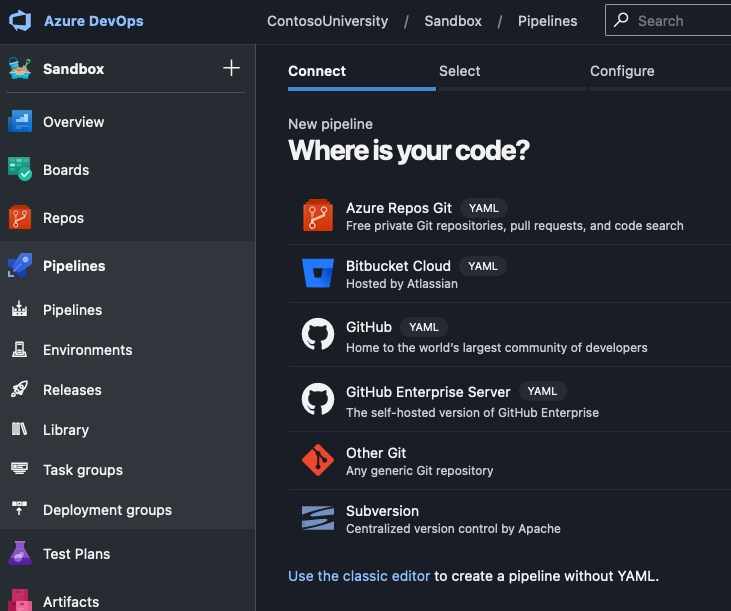
We are ready to write a YAML pipeline. In the left-hand navigation, click on Pipelines then on the Create pipeline button.
Click on Azure Repos Git and make sure you are using the YAML version, then pick your Git repo
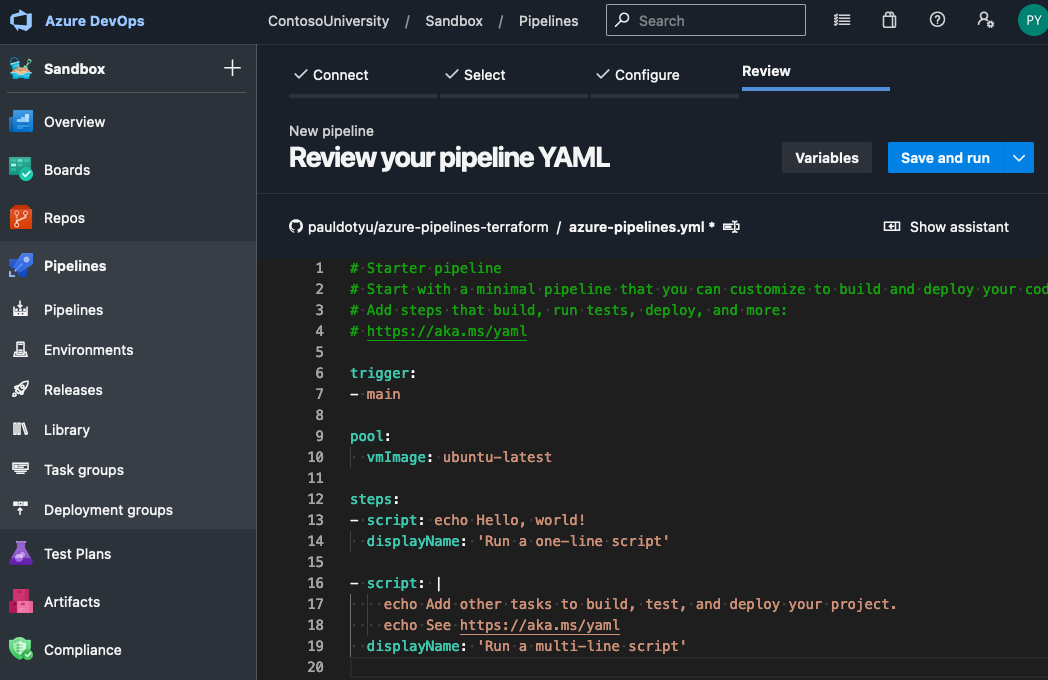
Click on Starter pipeline, then click on the Variables button to the left of Save and run.
Using the editor create the following secrets:
client-id- This is value ofappIdfrom your service principal creation output from a prerequisite step aboveclient-secret- This is the value ofpasswordfrom your service principal creation output from a prerequisite step abovetenant-id- This is the value oftenantfrom your service principal creation output from a prerequisite step abovedev-subscription-id- Subscription id for your dev environmenttest-subscription-id- Subscription id for your test environmentprod-subscription-id- Subscription id for your prod environment
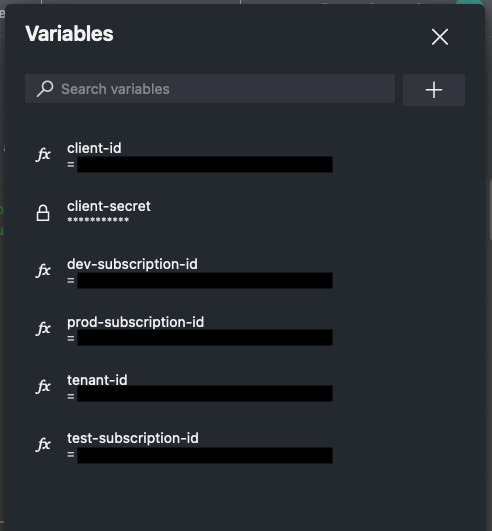
We are using pipeline variables; however, the best practice for this would be to use Azure Key Vault secrets.
We will not drop in our pipeline code. Don’t worry about understanding the logic yet, let’s watch it run first and I’ll then explain later.
If you prefer to work within a terminal, just click “Save and run” to generate a pipeline id and create pipeline variables using the Azure DevOps CLI.
az extension add --name azure-devops

org=<YOUR_ORGANIZATION_NAME>
proj=<YOUR_PROJECT_NAME>
pid=<YOUR_PIPELINE_ID> # this will be found in the querystring for your pipeline definition - the parameter is named definitionId
clientId=<YOUR_CLIENT_ID>
clientSecret=<YOUR_CLIENT_SECRET>
tenantId=<YOUR_TENANT_ID>
devSubId=<YOUR_DEV_SUBSCRIPTION_ID>
testSubId=<YOUR_TEST_SUBSCRIPTION_ID>
prodSubId=<YOUR_PROD_SUBSCRIPTION_ID>

az devops configure --defaults organization=https://dev.azure.com/$org

az pipelines variable create --name client-id --allow-override true --pipeline-id $pid --project $proj --secret false --value $clientId

az pipelines variable create --name client-secret --allow-override true --pipeline-id $pid --project $proj --secret true --value $clientSecret

az pipelines variable create --name tenant-id --allow-override true --pipeline-id $pid --project $proj --secret false --value $tenantId

az pipelines variable create --name dev-subscription-id --allow-override true --pipeline-id $pid --project $proj --secret false --value $devSubId

az pipelines variable create --name test-subscription-id --allow-override true --pipeline-id $pid --project $proj --secret false --value $testSubId

az pipelines variable create --name prod-subscription-id --allow-override true --pipeline-id $pid --project $proj --secret false --value $prodSubId
Copy the following code and overwrite what is currently in your code editor:
Don’t worry about understanding it all now, we’ll go through it bit by bit.
trigger:
  - main

pool:
  vmImage: ubuntu-latest

stages:
  - stage: dev
    displayName: Dev
    jobs:
      - job: plan
        displayName: Run terraform plan
        steps:
          - task: DownloadSecureFile@1
            name: dev
            displayName: Download backend config file
            inputs:
              secureFile: "dev-config.azurerm.tfbackend"
          - script: |
              terraform init -backend-config=$(dev.secureFilePath)
              terraform plan -var-file=dev.tfvars -out=$(Build.SourcesDirectory)/dev.tfplan
            displayName: Run terraform plan
            failOnStderr: true
            env:
              ARM_CLIENT_ID: $(client-id)
              ARM_TENANT_ID: $(tenant-id)
              ARM_CLIENT_SECRET: $(client-secret)
              ARM_SUBSCRIPTION_ID: $(dev-subscription-id)
          - task: PublishPipelineArtifact@1
            inputs:
              targetPath: "$(Build.SourcesDirectory)"
              artifact: "dev"
              publishLocation: "pipeline"
            condition: succeeded()
      - deployment: apply
        displayName: Run terraform apply
        dependsOn: plan
        environment: "dev"
        strategy:
          runOnce:
            deploy:
              steps:
                - download: none
                - task: DownloadPipelineArtifact@2
                  inputs:
                    buildType: "current"
                    artifactName: "dev"
                    targetPath: "$(Build.SourcesDirectory)"
                  displayName: Download artifacts
                - script: |
                    chmod -R a+x .terraform/*
                    terraform apply --auto-approve dev.tfplan
                  displayName: Run terraform apply
                  failOnStderr: true
                  workingDirectory: $(Build.SourcesDirectory)
                  env:
                    ARM_CLIENT_ID: $(client-id)
                    ARM_TENANT_ID: $(tenant-id)
                    ARM_CLIENT_SECRET: $(client-secret)
                    ARM_SUBSCRIPTION_ID: $(dev-subscription-id)
        condition: succeeded()
  - stage: test
    displayName: Test
    dependsOn: dev
    jobs:
      - job: plan
        displayName: Run terraform plan
        steps:
          - task: DownloadSecureFile@1
            name: test
            displayName: Download backend config file
            inputs:
              secureFile: "test-config.azurerm.tfbackend"
          - script: |
              terraform init -backend-config=$(test.secureFilePath)
              terraform plan -var-file=test.tfvars -out=$(Build.SourcesDirectory)/test.tfplan
            displayName: Run terraform plan
            failOnStderr: true
            env:
              ARM_CLIENT_ID: $(client-id)
              ARM_TENANT_ID: $(tenant-id)
              ARM_CLIENT_SECRET: $(client-secret)
              ARM_SUBSCRIPTION_ID: $(test-subscription-id)
          - task: PublishPipelineArtifact@1
            inputs:
              targetPath: "$(Build.SourcesDirectory)"
              artifact: "test"
              publishLocation: "pipeline"
            condition: succeeded()
        condition: succeeded()
      - deployment: apply
        displayName: Run terraform apply
        dependsOn: plan
        environment: "test"
        strategy:
          runOnce:
            deploy:
              steps:
                - download: none
                - task: DownloadPipelineArtifact@2
                  inputs:
                    buildType: "current"
                    artifactName: "test"
                    targetPath: "$(Build.SourcesDirectory)"
                  displayName: Download build artifacts
                - script: |
                    chmod -R a+x .terraform/*
                    terraform apply --auto-approve test.tfplan
                  displayName: Run terraform apply
                  workingDirectory: $(Build.SourcesDirectory)
                  failOnStderr: true
                  env:
                    ARM_CLIENT_ID: $(client-id)
                    ARM_TENANT_ID: $(tenant-id)
                    ARM_CLIENT_SECRET: $(client-secret)
                    ARM_SUBSCRIPTION_ID: $(test-subscription-id)
        condition: succeeded()
    condition: succeeded()
  - stage: prod
    displayName: Prod
    dependsOn: test
    jobs:
      - job: plan
        displayName: Run terraform plan
        steps:
          - task: DownloadSecureFile@1
            name: prod
            displayName: Download backend config file
            inputs:
              secureFile: "prod-config.azurerm.tfbackend"
          - script: |
              terraform init -backend-config=$(prod.secureFilePath)
              terraform plan -var-file=prod.tfvars -out=$(Build.SourcesDirectory)/prod.tfplan
            displayName: Run terraform plan
            failOnStderr: true
            env:
              ARM_CLIENT_ID: $(client-id)
              ARM_TENANT_ID: $(tenant-id)
              ARM_CLIENT_SECRET: $(client-secret)
              ARM_SUBSCRIPTION_ID: $(prod-subscription-id)
          - task: PublishPipelineArtifact@1
            inputs:
              targetPath: "$(Build.SourcesDirectory)"
              artifact: "prod"
              publishLocation: "pipeline"
            condition: succeeded()
        condition: succeeded()
      - deployment: apply
        displayName: Run terraform apply
        dependsOn: plan
        environment: "prod"
        strategy:
          runOnce:
            deploy:
              steps:
                - download: none
                - task: DownloadPipelineArtifact@2
                  inputs:
                    buildType: "current"
                    artifactName: "prod"
                    targetPath: "$(Build.SourcesDirectory)"
                  displayName: Download build artifacts
                - script: |
                    chmod -R a+x .terraform/*
                    terraform apply --auto-approve prod.tfplan
                  displayName: Run terraform apply
                  workingDirectory: $(Build.SourcesDirectory)
                  failOnStderr: true
                  env:
                    ARM_CLIENT_ID: $(client-id)
                    ARM_TENANT_ID: $(tenant-id)
                    ARM_CLIENT_SECRET: $(client-secret)
                    ARM_SUBSCRIPTION_ID: $(prod-subscription-id)
        condition: succeeded()
    condition: succeeded()
Click the Save button, commit the file to your repo, then navigate back to the pipelines page. You should see it running and it will ask you for permission to run. You will need to watch this and approve as the build progresses through the stages.
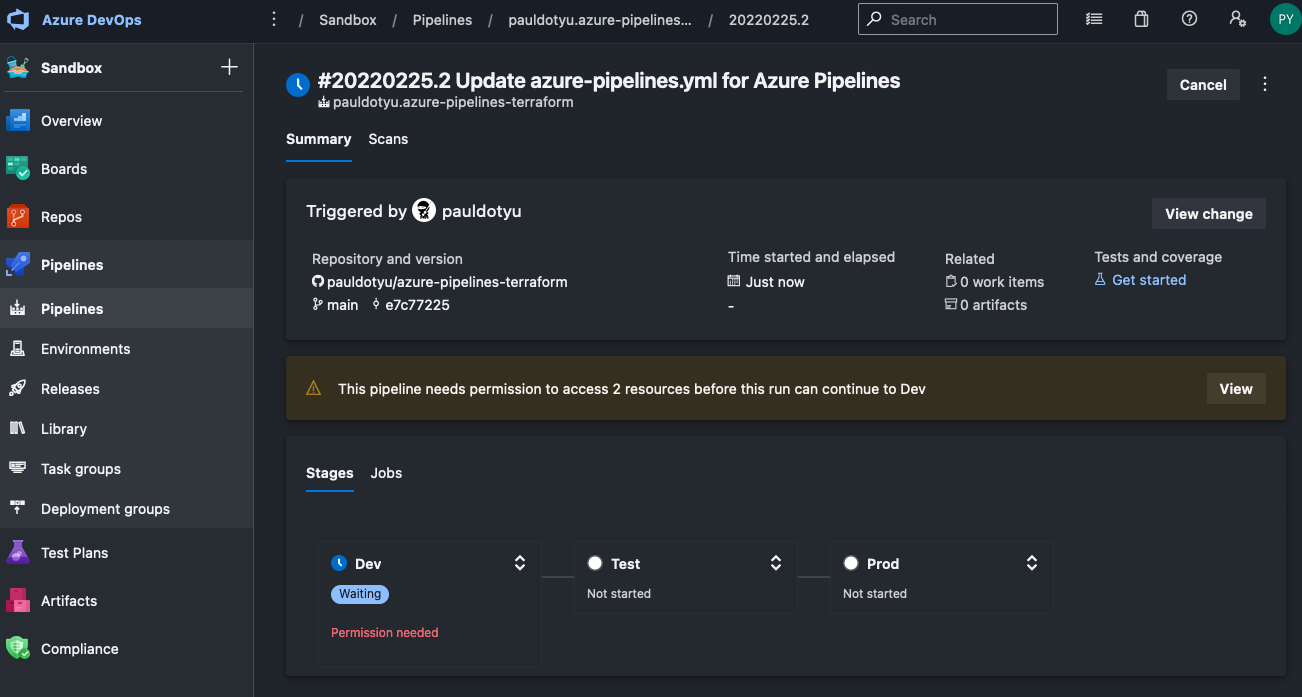
Click the View button and click on the two Permit buttons to allow the pipeline to use your secure file and environment.
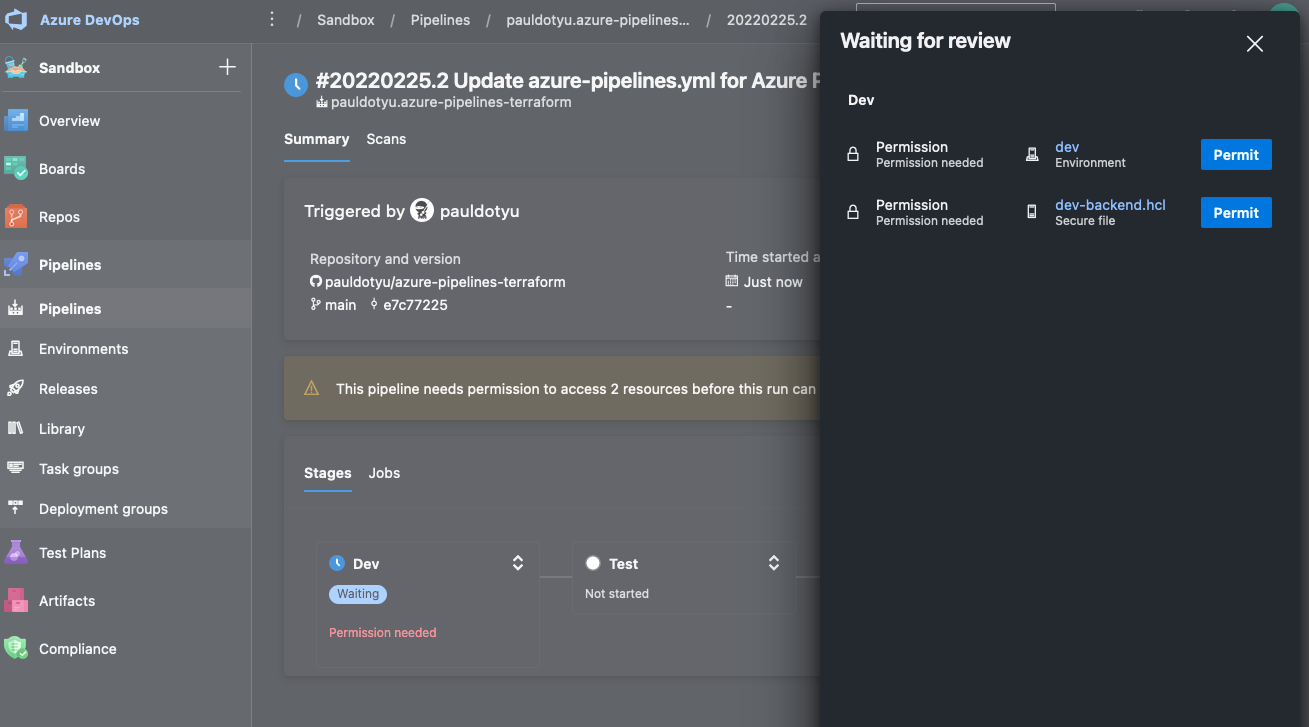
You will need to do this once for each stage. Once a pipeline has been given permission, you do not need to permit again.
When the pipeline gets to the test stage, you will notice it is asking you to review. This is here because we placed an Approval check on the test environment earlier. The same will apply to the prod stage as it attempts to deploy into the prod environment.
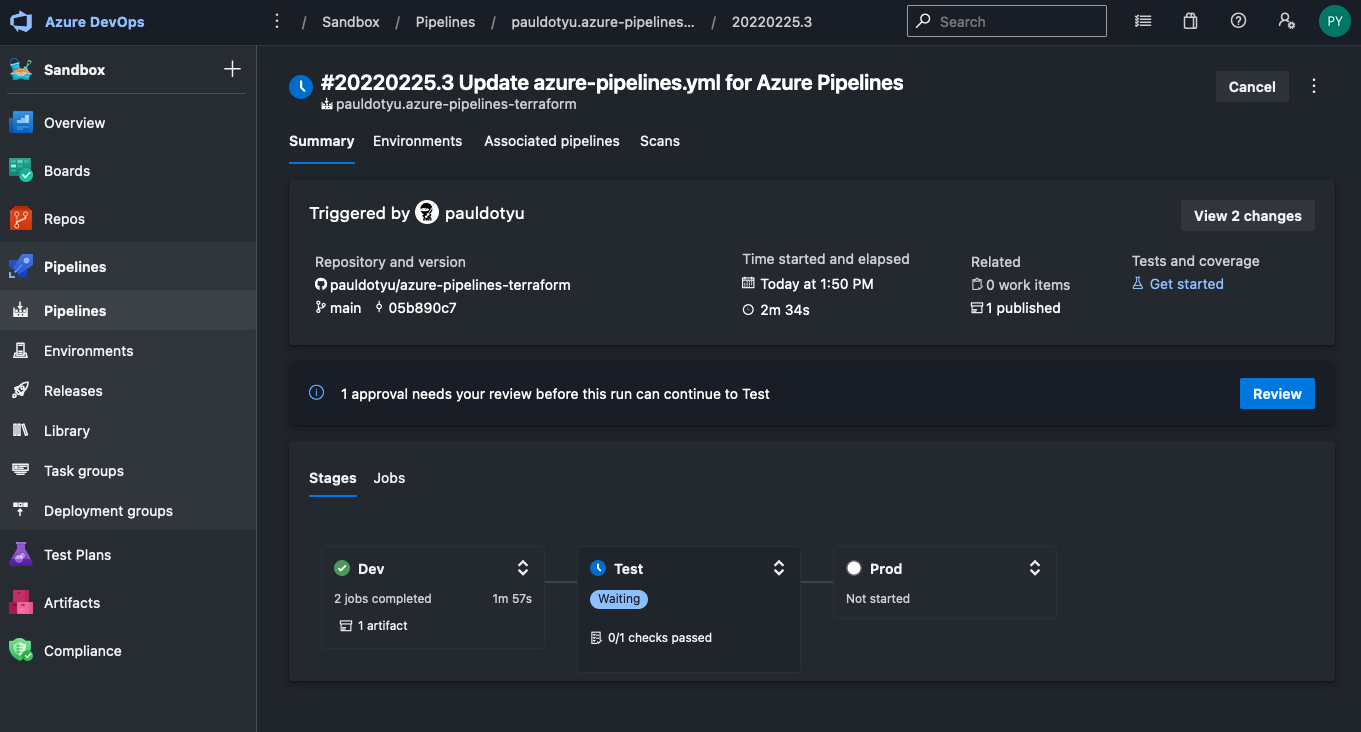
Click the Review button and then the Approve button to approve.
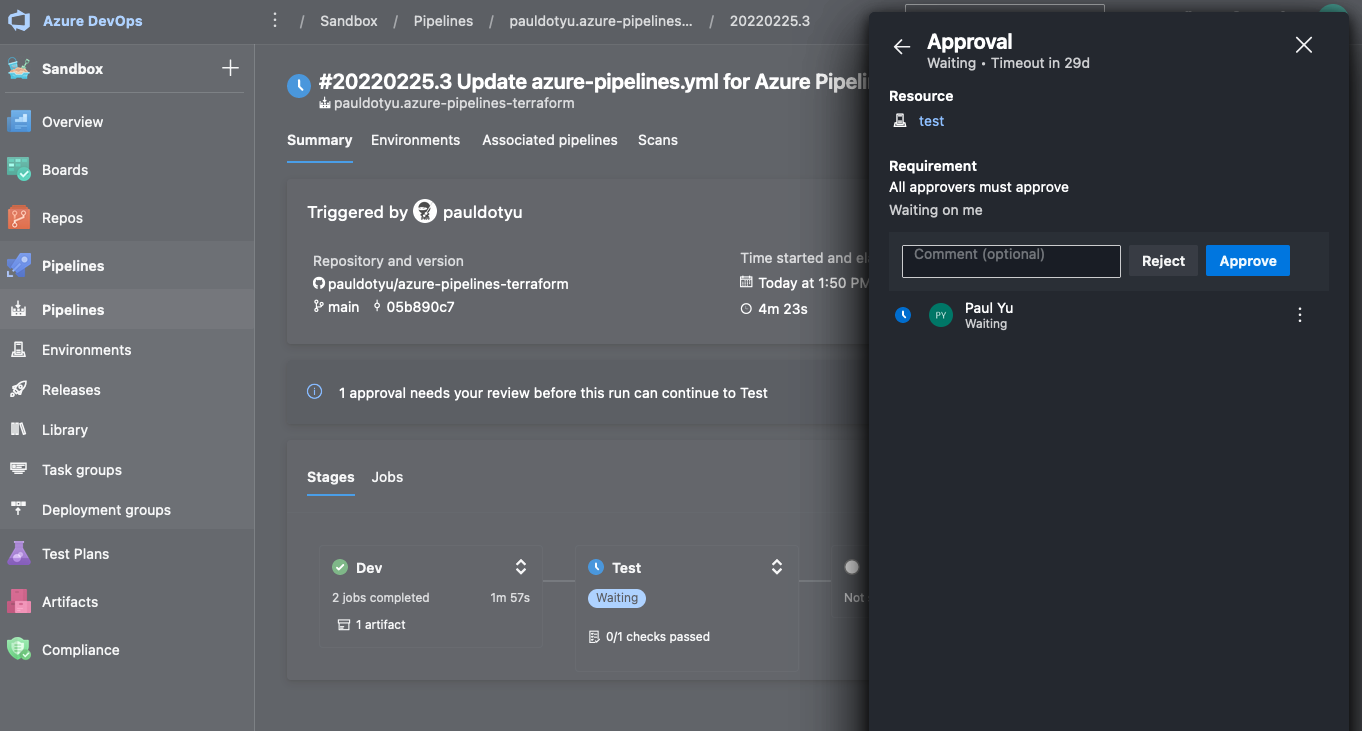
Repeat these step for the prod stage
Azure Pipeline Explanation
So now, let’s talk about what is going on here.
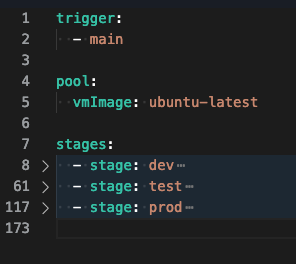
If we collapse the YAML down into stages, we can see it’s fairly simple in structure. There is a stage for each environment we are deploying into.
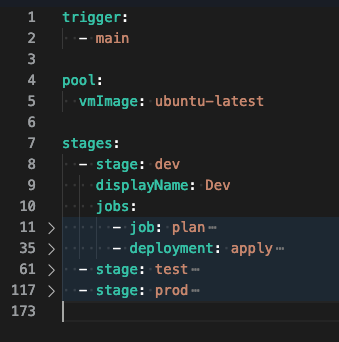
Let’s dig one level deeper and look at the jobs within the dev stage. Within each stage, there is a plan job, which will execute our terraform plan command, and a deployment job which will execute the terraform apply command to deploy resources into an environment.
Let’s expand the plan job and focus on lines 11 - 34. In the plan job, three steps will be executed:
- Download the dev secure file. This will contain information for initializing the terraform directory using the dev storage account.
- Execute
terraform initand passing in the backend configuration file at runtime, then executing aterraform plancommand. Note this command accepts the*.tfvarsfile at runtime (based on environment) and outputs the plan results to a file calleddev.tfplan. - Publish the terraform code and plan output file as a pipeline artifact.
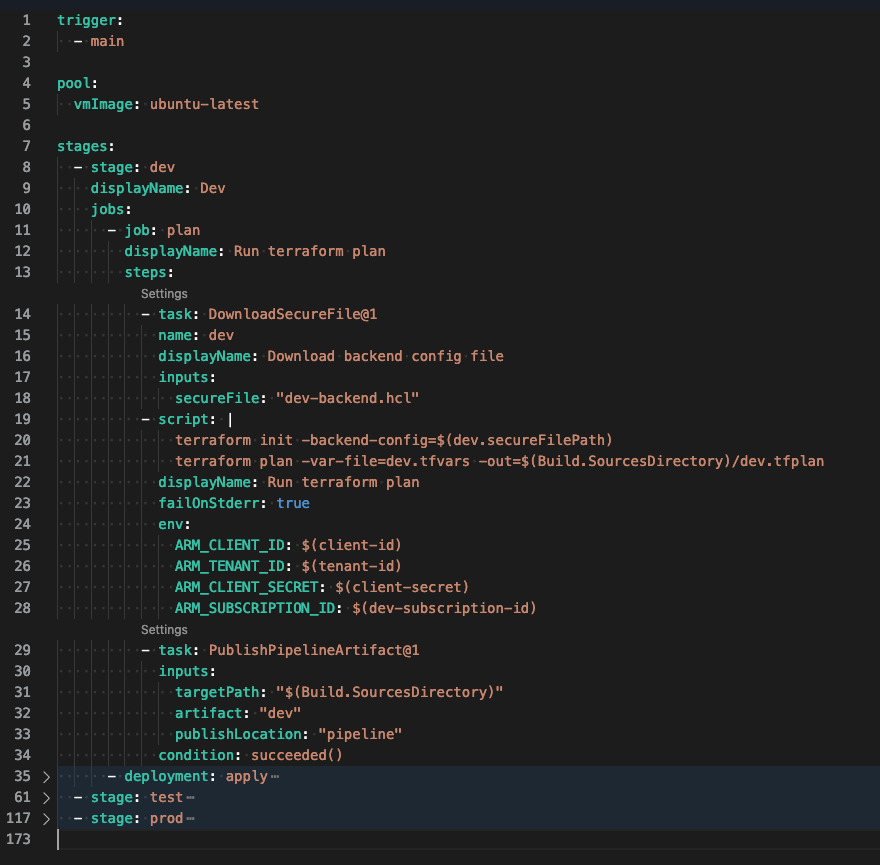
The variables we added to the pipeline are used as environment variables for Terraform to use as it executes commands.
Now let’s expand the apply deployment job and focus on lines 35 - 60.
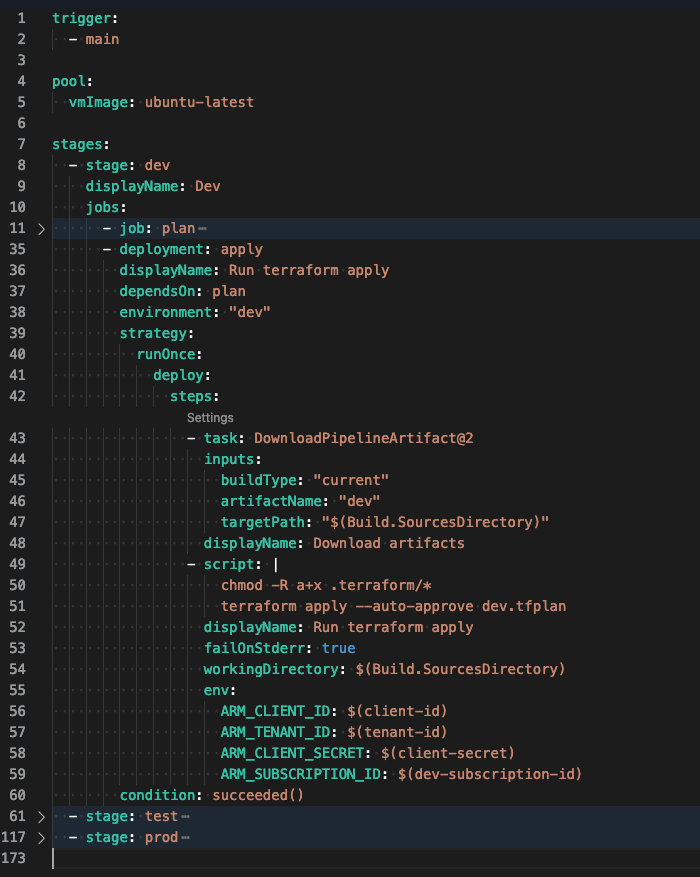
Note there’s a few things going on here. First, since we are deploying into an Azure Pipeline environment, we must specify the environment on line 38. We then use the runOnce deployment strategy and within the deploy steps, execute the following
- Download the pipeline artifact
- Execute the
terraform applycommand and passing in the dev.tfplan file
Line 50 is here because when we packaged up the terraform code, it includes the
.terraformdirectory which includes binaries needed to execute theterraform applycommand. Since the files were downloaded from the artifact, the process that is running the deployment job need proper permissions to execute.
Finally, there is linkage between jobs using the dependsOn property (line 37) and conditions to ensure jobs will only run if the dependent job was successful.
The stages are repeated for test and prod and the only elements that we change are the backend configuration files, *.tfvars files, and environment variables in the form of pipeline variables.
Summary
Using this approach, you can write your Terraform code (keeping to DRY principals) and have a single Azure Pipeline to deploy to various environments. You can argue that we are repeating ourselves with a section of pipeline code for each stage in our azure-pipelines.yaml file, but if it really bothers you, I suppose you can make this pipeline a single stage pipeline and pass in environment values at runtime, but I’ll leave it as is for now 😉
With regard to protecting environments using other methods such as branch protection or others, I’d suggest you take a look at this doc to see what other pieces of approvals and checks you can employ around your environments.
Cheers!