Run Your Pipelines in Azure Container Instance
Background
- Microsoft-hosted Azure Pipeline agent run in the public space; therefore, they can only deploy to environments that are publicly accessible.
- Some organizations may need to deploy to target environments that are only accessible within private space (e.g., inside a Azure Virtual Network).
- When the target environment is not publicly accessible, deploying self-hosted pipelines agents are a common solution.
- Organizations can self-host Azure Pipeline agents on Linux, macOS, or Windows (physical or virtual machines) or Azure Virtual Machine Scale Sets; however, this may introduce unwanted overhead in having to patch and maintain these machines.
- The alternative is to run an agent in a Docker container and host it in Azure Container Instance which can run inside of the organization’s virtual network and we’ll explore this option for the rest of this guide.
Architecture

Local Tools Required
You’ll need the tools listed below to follow along this Tutorial:
NOTE: I am using Bash on Windows Subsystem for Linux (WSL). If you are using PowerShell, you’ll need to translate some of the command syntax.
Azure Resources
Resources that will be deployed within your Azure subscription:
- Azure Container Registry
- Azure Container Instance
- Azure Virtual Network with virtual network peering in place to communicate with other resources in Azure
- Azure Key Vault
- Azure Service Principal
Step 1: Customize and build your Docker agent and run locally
Let’s begin by running our container locally to see it all working. If all you need is for the agent to run locally, you can jump to Step 5 in this guide.
This doc walks you through building your base Dockerfile and includes the container startup script you’ll need to include in your container build process.
The base container will get you just enough to run the agent software and register itself within your Azure DevOps Organization.
In my use case, I’ll be using it to provision Azure infrastructure (IaC) so I’ll need to customize the container to include additional tools such as Terraform, Ansible, etc.
Here are the changes I’ve added to my container (highlighted in the right column):

Make sure you have the
Dockerfileandstart.shfiles in the same directory and go build the container.This assumes you are in the directory where
Dockerfileandstart.shsits# Name and tag this container however you want docker build -t azpagent:latest .To run the container, you will need to pass in some environment variables on startup:
AZP_URLis your Azure DevOps Organization URL (i.e., https://dev.azure.com/ContosoUniversity/)AZP_TOKENis your PAT which you can obtain by following this docAZP_AGENT_NAMEis your what you want your build agent name to be. In my example below I am simply using my hostname as the build agent name.AZP_POOLis your build agent pool (you may need to create this ahead of time, if so, follow this doc)
Setup your variables and pass them in as environment variables to the container.
docker run -d -e AZP_URL=$AZDO_URL -e AZP_TOKEN=$AZDO_TOKEN -e AZP_AGENT_NAME=$(hostname)-1 -e AZP_POOL=$AZDO_POOL azpagent:latestYou should see your agent reporting with a status of “Online”. See this doc if you need assistance in navigating to your agent pool.
Step 2: Publish your Docker agent container to Azure Container Registry
If you do not already have an Azure Container Registry deployed, go through this guide to create one.
You have two options for getting your images into your Azure Container registry:
Build the container locally and push using
docker buildanddocker pushcommands. See this guide for more.NOTE: You will need to login to your registry using
az acr loginordocker logincommandsBuild the container in Azure using ACR Tasks. See this guide for more.
The rest of this section will use ACR tasks to build and push the container and we will be using Azure CLI within a Bash shell for this work.
Set up your variables
RG_NAME=rg-containercentral
ACR_NAME=contosocr
ACR_REPO=azpcontoso
ACR_REPO_TAG=latest
Build the image
NOTE: This is assuming you are in the directory that contains your Dockerfile
az acr build --registry $ACR_NAME --image $ACR_REPO:$ACR_REPO_TAG .Get your image
ACR_LOGIN_SERVER=$(az acr show --name $ACR_NAME --resource-group $RG_NAME --query "loginServer" --output tsv)
LATEST_TAG=$(az acr repository show-manifests -n $ACR_NAME --repository $ACR_REPO --query "[].tags[0]" -o tsv)
IMAGE=$ACR_LOGIN_SERVER/$ACR_REPO:$LATEST_TAG
echo $IMAGE
Step 3: Prepare for deploying your container in Azure Container Instance by configuring registry authentication
This doc will walk you through the process of configuring authentication for your Azure Container Instance to use images stored in your Azure Container Registry. The process will involve creating a new service principal that has acrpull privileges against your newly created Azure Container Registry. We’ll be passing in the service principal’s credentials upon creation of the Azure Container Instance.
NOTE: There are known limitations with running ACI from ACR so be sure to periodically check this link out for updates
If you do not already have an Azure Key Vault, follow this guide to set one up
Set up your variables
AKV_NAME=kvdevops1Create service principal, store its password in vault (this will be the registry’s password)
az keyvault secret set \
  --vault-name $AKV_NAME \
  --name $ACR_NAME-pull-pwd \
  --value $(az ad sp create-for-rbac \
        --name http://$ACR_NAME-pull \
        --scopes $(az acr show --name $ACR_NAME --query id --output tsv) \
        --role acrpull \
        --query password \
        --output tsv)
Store service principal ID in vault (this will be the registry’s username)
az keyvault secret set \
  --vault-name $AKV_NAME \
  --name $ACR_NAME-pull-usr \
  --value $(az ad sp list --display-name http://$ACR_NAME-pull --query "[0].servicePrincipalNames[0]" -o tsv)
Step 4: Run your container in Azure Container Instance (in a virtual network)
To run your ACI in a virtual network, you’ll need a virtual network with a subnet delegated to Microsoft.ContainerInstance/containerGroups
NOTE: With subnet delegation in place, no services can be deployed into the subnet other than ACI.
If you don’t already have a virtual network and subnet created, follow this guide to create a virtual network.
With a virtual network and subnet in place, you can add the subnet delegation:
VNET_NAME=vn-devops
SNET_NAME=ACISubnet

az network vnet subnet update \
  --resource-group $RG_NAME \
  --name $SNET_NAME \
  --vnet-name $VNET_NAME \
  --delegations Microsoft.ContainerInstance/containerGroups
Create the Azure Container Instance
NOTE: You will need to pass in your Azure DevOps URL, PAT, agent name, and agent pool as environment variables. Similar to what we did in Step # 1 above.
az container create \
  -g $RG_NAME \
  -n $ACI_NAME \
  --image $IMAGE \
  --registry-login-server $ACR_LOGIN_SERVER \
  --registry-username $(az keyvault secret show --vault-name $AKV_NAME -n $ACR_NAME-pull-usr --query value -o tsv) \
  --registry-password $(az keyvault secret show --vault-name $AKV_NAME -n $ACR_NAME-pull-pwd --query value -o tsv) \
  --vnet $VNET_NAME \
  --subnet $SNET_NAME \
  --restart-policy never \
  --cpu 1 \
  --memory 1 \
  --os-type Linux \
  -e AZP_URL=$AZDO_URL AZP_AGENT_NAME=$ACI_NAME AZP_POOL=$AZDO_POOL \
  --secure-environment-variables AZP_TOKEN=$AZDO_TOKEN
Verify your container is running and has been assigned a private IP
az container show -g $RG_NAME -n $ACI_NAME -o table
Step 5: Use this agent in your pipelines
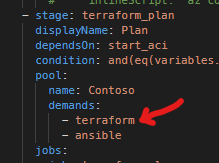
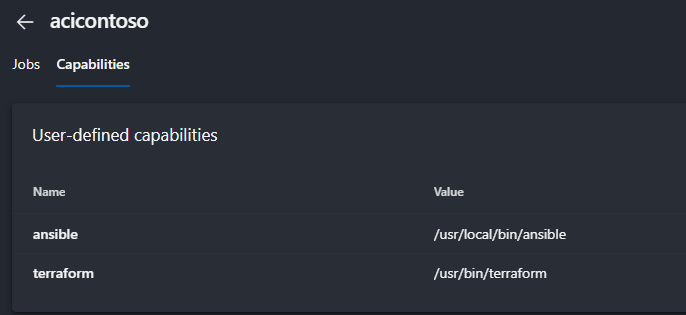
With the container instance up and running, you can view the status of your agent by navigating to your agents page in Azure DevOps. You can also add additional capabilities to your agent to ensure you are choosing the right agent for the right job based on your build demands
In your pipeline, you can then “demand” certain capabilities are in place for an agent to be eligible to run a pipeline